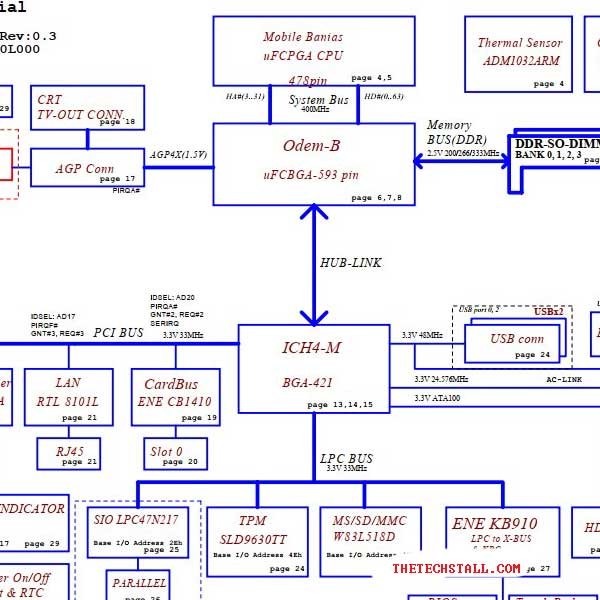
Are you struggling to repair your Lenovo A500G_E600 laptop? Don’t worry, we’ve got you covered! Introducing our free downloadable LA-1971 Rev 0.3 schematic diagram, designed to make laptop repair a breeze.
In the realm of laptop motherboard repair, the Boardview file stands as an indispensable tool alongside the conventional schematic diagram. Its significance cannot be overstated. When delving into the intricacies of motherboard troubleshooting and restoration, the Boardview file emerges as a crucial asset.
In the landscape of electronics repair, comprehending the layout and interconnections of components is paramount. Here, the Boardview file steps in as a visual aid that complements the schematic diagram. It unveils the blueprint of the PCB (printed circuit board) with unparalleled clarity, unraveling the complex web of connections and pathways.
Exclusive Access: Get Your Hands on Lenovo Laptop BoardView File Free
Laptop repairs can be intimidating, especially without the right resources. The LA-1971 Rev 0.3 schematic diagram is a comprehensive visual guide that outlines the intricate connections and components within your Lenovo A500G_E600 laptop. It’s like having a roadmap for your repair journey, allowing you to:
Identify Components: With the schematic diagram, you can quickly locate various components on your laptop’s motherboard. This means no more guessing or trial-and-error during repairs.
Troubleshoot Effectively: Is your laptop facing a mysterious issue? The diagram helps you trace the flow of signals and power, enabling you to pinpoint the root cause of the problem.
Save Time and Money: Rather than spending hours trying to figure out the wiring and connections, the LA-1971 Rev 0.3 schematic diagram lets you work efficiently, reducing repair time and potential errors.
Increase Repair Confidence: Whether you’re a professional technician or a DIY enthusiast, having a clear visual aid boosts your confidence while working on complex repairs.
A laptop technician might need a BIOS BIN (Basic Input/Output System Binary) file for various reasons, primarily related to troubleshooting, repairing, or updating the laptop’s BIOS firmware. The BIOS is a fundamental software component that initializes and controls hardware components during the boot-up process. Here are some scenarios where a technician might need a BIOS BIN file:
Flashing or Updating BIOS: Sometimes, laptops require a BIOS update to fix bugs, improve compatibility, or add new features. If the standard BIOS update process fails or if the laptop’s BIOS is corrupted, a technician might use a BIOS BIN file to manually re-flash the BIOS and recover the system.
Corrupted BIOS: If the laptop’s BIOS becomes corrupted due to a failed BIOS update, hardware issues, or other reasons, the laptop might become unbootable. In such cases, a technician could use a BIOS BIN file along with specialized tools to reprogram the BIOS chip and restore functionality.
Bricked Laptops: If a laptop becomes “bricked,” meaning it won’t boot or respond due to a failed firmware update or other issues, a technician might use a BIOS BIN file to attempt recovery by rewriting the BIOS chip.
Recovering Data: Occasionally, technicians might need to recover data from a laptop with a faulty BIOS. By reprogramming the BIOS with a compatible BIN file, they could restore the laptop’s functionality temporarily to retrieve important data.
It’s important to note that working with BIOS files and firmware flashing can be risky, as improper handling can lead to further damage or even complete hardware failure. Technicians should have the appropriate tools, knowledge, and resources before attempting any BIOS-related operations. In many cases, contacting the laptop manufacturer’s support or seeking professional assistance might be the best course of action.
Don’t Miss Out! Lenovo laptop BIOS BIN File Free
Download for Free: We’re offering the LA-1971 Rev 0.3 schematic diagram absolutely free of charge. Just click the download link and have it ready for your repair project.
Study the Diagram: Take a close look at the diagram and familiarize yourself with the symbols, components, and connections. Understanding the layout is the key to successful troubleshooting.
Follow the Path: When diagnosing or repairing a specific issue, follow the signal path indicated on the diagram. This will help you track down where the problem might be occurring.
Safety First: Remember to follow proper safety precautions while working on your laptop. Disconnect the power source and handle components with care.
Schematic diagrams play a pivotal role in laptop troubleshooting, providing invaluable insights into the intricate circuitry and components that power these modern devices. As laptops become more complex, having access to these visual representations can significantly expedite the diagnostic and repair process.
Understanding Circuit Connections: Schematic diagrams offer a clear and concise depiction of the various circuit connections within a laptop. These visual blueprints outline how different components are interconnected, enabling technicians to identify potential points of failure more efficiently. Whether it’s a malfunctioning power supply or a faulty component, having a schematic diagram at hand aids in pinpointing the root cause.
Accurate Diagnosis of Issues: Laptops are composed of intricate electronic components, and when something goes wrong, diagnosing the problem accurately is crucial. Schematic diagrams provide a roadmap to the internal workings of the laptop, allowing technicians to follow the flow of signals and voltage. This level of precision helps in identifying where disruptions or abnormalities occur, facilitating faster and more accurate issue resolution.
Efficient Repair Procedures: Without a doubt, laptop repairs can be time-consuming, especially when dealing with intricate hardware. Schematic diagrams streamline the repair process by offering step-by-step visual guidance. Technicians can follow the diagram to disassemble, replace, or repair specific components, minimizing guesswork and reducing the risk of further damage.
Whether you’re a tech professional or an eager DIYer, this schematic diagram is your ultimate tool for Lenovo A500G_E600 laptop repairs. Don’t miss out on this valuable resource – it’s just a click away!
Share with friends
thetechstall.com would like to share with you all the resources you need to repair desktop and laptop motherboards for free.
Developed By: Ibrahim Hossen