Is your Gigabyte GA-Z170X-GAMING 5 motherboard not working? You’re not alone. Whether it’s a power issue, no display, or random shutdowns, motherboard failures are frustrating—especially when they interrupt your workflow or gaming sessions. But here’s the good news: with the GA-Z170X-GAMING 5 Schematic Diagram and the Gigabyte GA-Z170X-GAMING 5 Motherboard Schematic Diagram, you might be just one download away from diagnosing and fixing the problem yourself.
In this blog, we’ll walk you through how schematic diagrams can save your repair, what these specific diagrams offer, and how you can instantly download them for free to kickstart your motherboard repair process.
Before we dive into the specifics, let’s address the elephant in the room: what exactly is a schematic diagram?
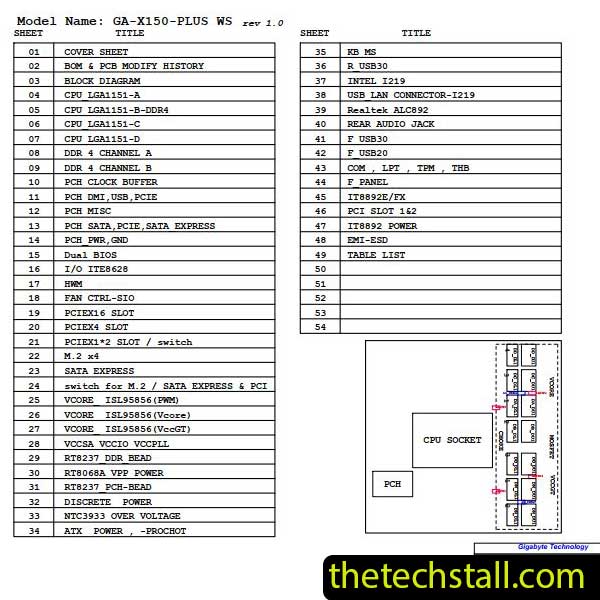
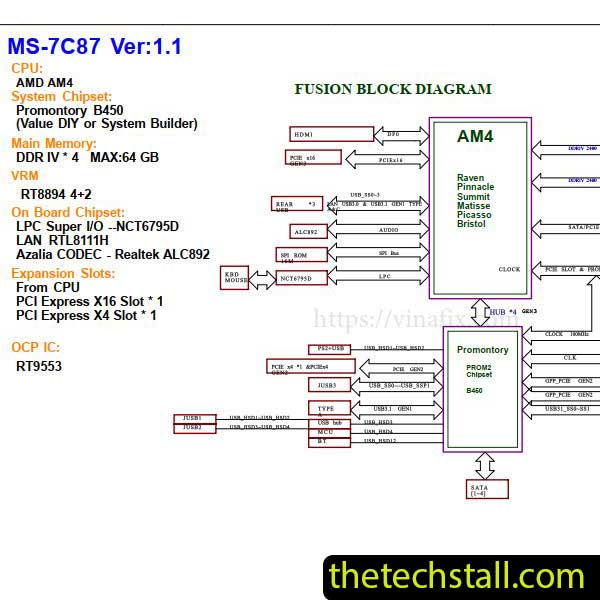
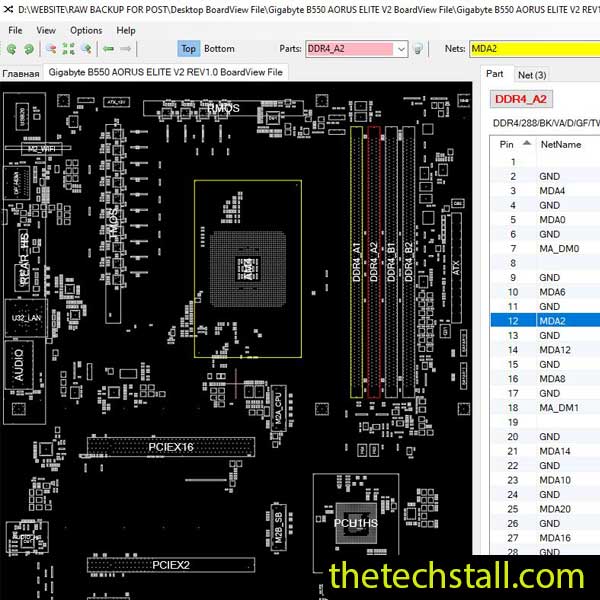
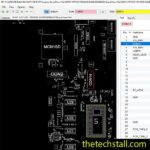
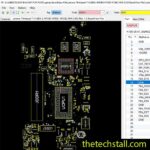
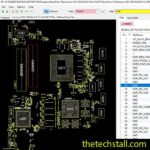
A motherboard schematic diagram is like a blueprint for your motherboard’s electronic circuits. It shows all the electrical pathways, components, and interconnections. If you’re facing a fault—say, no power or faulty USB ports—the schematic diagram helps you trace the issue precisely.
For the Gigabyte GA-Z170X-GAMING 5 and its close variant, the GA-Z170X-GAMING 5, the schematic diagrams are extremely helpful because:
Whether you’re a repair technician, a hobbyist, or someone trying to save money on costly repairs, having the right schematic in hand gives you a huge advantage.
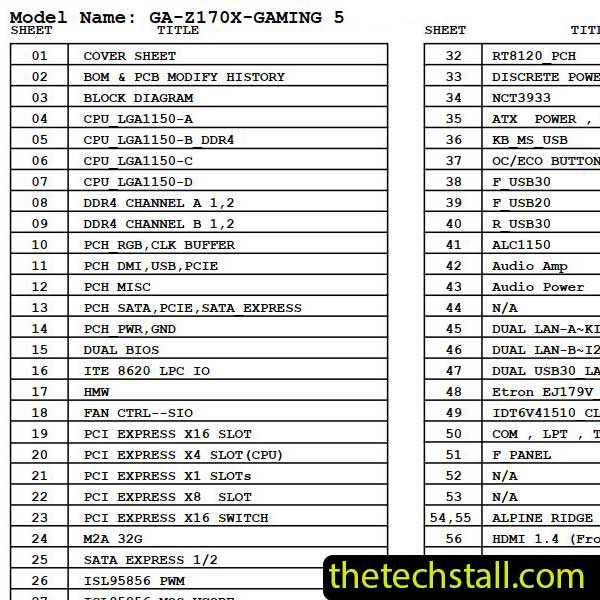
When it stops working, the Gigabyte GA-Z170X-GAMING 5 schematic diagram becomes a key diagnostic tool. Inside this downloadable PDF, you’ll find:
This schematic will allow you to track down faults faster, whether you’re using a multimeter, oscilloscope, or just visual inspection.
You might be wondering—why mention the GA-Z170X-GAMING 5 schematic diagram when you’re dealing with a Gigabyte board?
Here’s the deal: GA-Z170X-GAMING 5 is an OEM variant that shares a nearly identical layout and chipset architecture with the Gigabyte GA-Z170X-GAMING 5. In fact, in many repair cases, the GA-Z170X-GAMING 5 schematic serves as the only available reference when the Gigabyte version isn’t documented.
In practical terms, if your Gigabyte GA-Z170X-GAMING 5 has a dead VRM or no CPU fan spin, using the GA-Z170X-GAMING 5 schematic diagram can guide your troubleshooting step by step. The CPU socket power rails, the chipset communication lines, and USB 3.0 tracks often follow the same patterns and numbering.
So even if you can’t find the original Gigabyte schematic, this one will likely be 95%+ applicable, making it your next best (and often only) option.
Using the GA-Z170X-GAMING 5 and Gigabyte GA-Z170X-GAMING 5 schematic diagrams, users have successfully fixed issues such as:
Having the correct schematic lets you test methodically instead of guessing. That’s the difference between swapping random parts and doing real electronics repair.
We know how important it is to get your system back up and running. That’s why we’re offering both the GA-Z170X-GAMING 5 schematic diagram and the Gigabyte GA-Z170X-GAMING 5 motherboard schematic diagram available for free download right here.
No signups. No hidden fees. Just useful repair resources for technicians and tech enthusiasts.
When your Gigabyte GA-Z170X-GAMING 5 motherboard stops working, don’t toss it out or spend hundreds on a replacement. Start with a logical diagnosis—and for that, these schematic diagrams are your best friends.
Whether you’re repairing for yourself or for a customer, the GA-Z170X-GAMING 5 schematic diagram gives you the insight you need to get results. So go ahead, download the schematics, power up your multimeter, and bring that board back to life.

For tips on chip-level repair of laptop and desktop motherboards, visit our YouTube channel Repair Assistant and subscribe to our Facebook page repairassiastantbd for repair resource updates.
Stay tuned for more schematic resources and repair guides—and happy fixing!