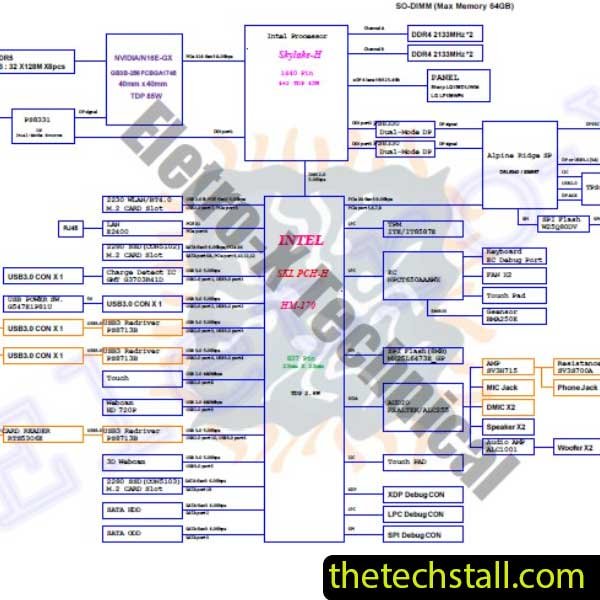
Effortless Repair: Acer Predator G9-593 Motherboard Fix Using Pegatron MU5DC/CH7DC REV2.0 Schematic Diagram
When your Acer Predator G9-593 laptop encounters issues, the motherboard is often the culprit. Repairing it can seem daunting, but with the right tools and information, you can tackle it effortlessly. One invaluable resource for DIY enthusiasts and professional technicians alike is the Pegatron MU5DC/CH7DC REV2.0 schematic diagram.
Understanding the Motherboard
The motherboard is the heart of your laptop, connecting all its components and ensuring they communicate effectively. In the Acer Predator G9-593, the motherboard is based on the Pegatron MU5DC/CH7DC REV2.0 design. This schematic diagram provides a detailed blueprint of the motherboard’s circuits and components, making it easier to diagnose and fix issues.
Why Use Pegatron MU5DC/CH7DC REV2.0 Schematic Diagram for Acer Predator G9-593 laptop repair?
A schematic diagram is essential for several reasons:
- Component Identification: It helps you identify and locate components on the motherboard, such as resistors, capacitors, and integrated circuits.
- Circuit Tracing: It allows you to trace the pathways of circuits, which is crucial for diagnosing where a fault might occur.
- Efficient Repairs: With a clear understanding of the motherboard layout, repairs can be carried out more efficiently, saving time and reducing the risk of causing further damage.
How to Download Boardview Files for Free
Accessing boardview files can sometimes be challenging due to availability and cost. However, we offer a selection of boardview files that you can download for free. Follow these simple steps to access them:
- Visit Our Download Page: Go to the download section of our website.
- Select Your Model: Use the search feature to find the specific laptop model you need.
- Download the File: Click the download button and save the file to your device.
- Open with a Boardview Viewer: Use software like OpenBoardView or .GR BoardViewer or Hohan BoardView Software or Allegro Free Board Viewer V 17.2 or BoardViewer 2.0.1.9(Beta) to open and view the file.
Common Motherboard Issues and How to Fix Them using Pegatron MU5DC/CH7DC REV2.0 Schematic Diagram
1.No Power or Random Shutdowns
Symptoms: Your laptop doesn’t power on or shuts down unexpectedly.
Solution:
- Check Power Source: Ensure the power adapter and battery are functioning.
- Inspect Power Circuit: Use the schematic diagram to locate and test the power circuit components for faults.
- Replace Faulty Components: If any component, like a capacitor or MOSFET, is faulty, replace it with a compatible part.
2.No Display or Distorted Graphics
Symptoms: The screen remains blank, or graphics are distorted.
Solution:
- Check Connections: Ensure the display cable is securely connected.
- Test GPU and Display Circuits: Use the diagram to identify and test GPU-related components and connections.
- Repair or Replace: Fix broken traces or replace defective components.
3.USB Ports Not Working
Symptoms: USB devices aren’t recognized or functioning properly.
Solution:
- Inspect USB Port Connections: Ensure all physical connections are intact.
- Trace USB Circuit: Use the schematic to trace and test the USB circuit for any breaks or faulty components.
- Component Replacement: Replace any damaged ports or components identified during testing.
Tools You’ll Need
- Multimeter: For testing electrical circuits and components.
- Soldering Iron: For replacing faulty components.
- Anti-static Wristband: To prevent static damage to components.
- Pegatron MU5DC/CH7DC REV2.0 Schematic Diagram: Your blueprint for the repair.
Tips for Successful Repairs
- Work in a Static-Free Environment: Static electricity can damage sensitive components.
- Keep Track of Screws and Parts: Organize screws and parts as you disassemble the laptop to ensure easy reassembly.
- Take Your Time: Rushing can lead to mistakes, so proceed methodically and carefully.
Using the Pegatron MU5DC/CH7DC REV2.0 schematic diagram can make troubleshooting and repairing your Acer Predator G9-593 motherboard much more manageable. Join here to get help from the tech stall support team
Download “Acer Predator G9-593 Pegatron MU5DC/CH7DC REV 2.0 Schematic Diagram” view – Downloaded 632 times – 86.66 KB
Repairing your Acer Predator G9-593 motherboard doesn’t have to be a complex task. With the Pegatron MU5DC/CH7DC REV2.0 schematic diagram and the right tools, you can diagnose and fix common motherboard issues effortlessly. Whether you’re dealing with power problems, display issues, or malfunctioning USB ports, following this guide will help you get your laptop back in working order.
If you found this guide helpful, feel free to share it with others facing similar issues with their Acer laptops! By empowering yourself with knowledge and tools, you can save time and money while keeping your Acer Predator G9-593 running smoothly. Happy repairing!
