When it comes to modern laptop repairs, guessing is expensive. Laptop’s newer logic boards are incredibly compact, layered, and complex, especially inside devices like the Lenovo IdeaPad L340-15API. For laptop motherboard technicians, one missing voltage line or a damaged communication signal can turn a simple repair into hours of unnecessary troubleshooting. That’s exactly why the NM-C101 Schematic Diagram has become one of the most valuable repair resources for chip-level technicians working on laptop devices.
Whether you run a professional repair lab or work independently from your bench setup, having access to the correct schematic can dramatically improve repair accuracy, save time, and reduce costly mistakes.
The Lenovo IdeaPad L340-15API is built around a highly integrated motherboard design. Unlike older laptops where components were easier to isolate, modern laptop boards rely heavily on tightly connected power rails, sensors, USB communication circuits, and advanced charging architecture.
Without a proper boardview or schematic, diagnosing faults on this machine becomes extremely difficult. Common problems technicians face include:
This is where the NM-C101 Schematic Diagram becomes essential.
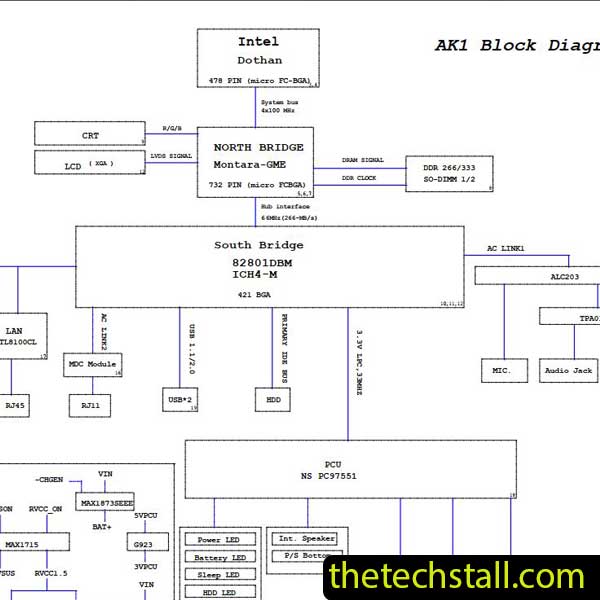
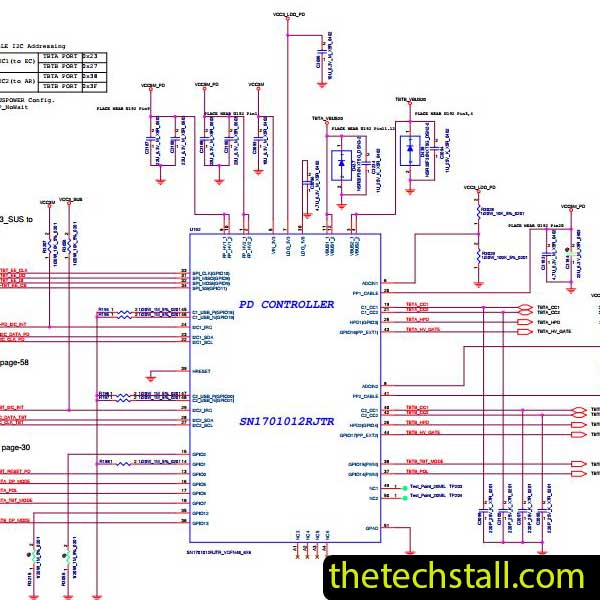
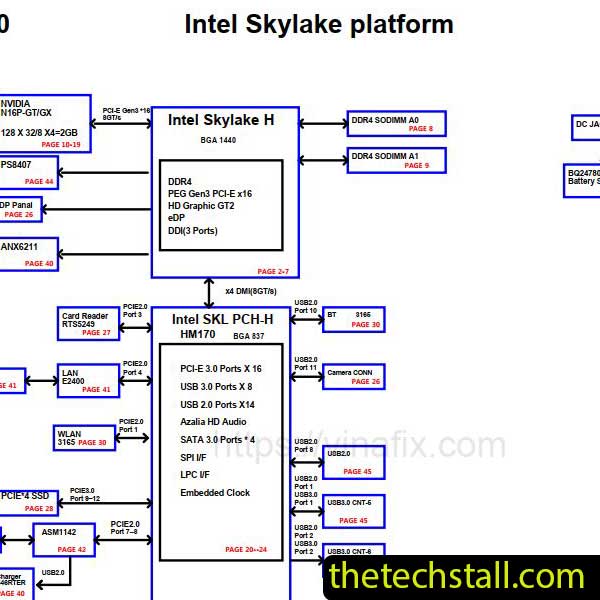
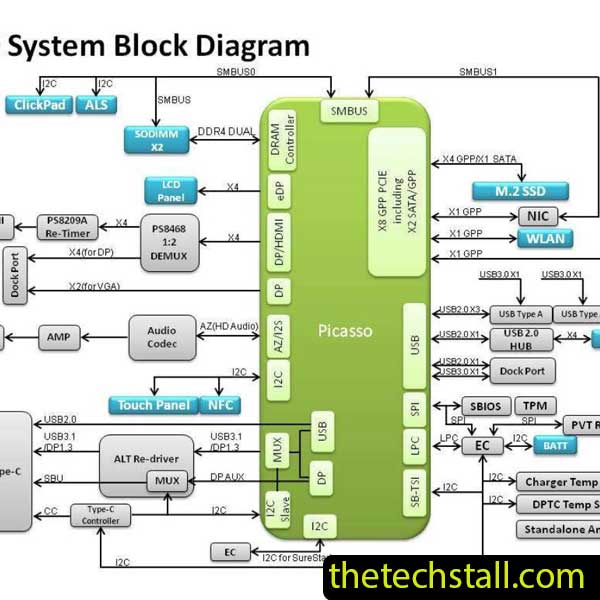
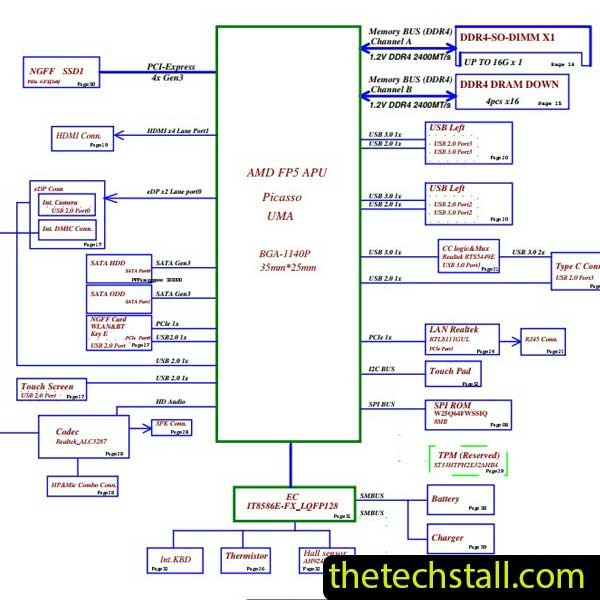
The NM-C101 Schematic Diagram is a detailed electronic circuit blueprint of the Lenovo IdeaPad L340-15API motherboard. It shows the relationship between components, voltage lines, signal paths, resistance values, and IC connections across the board.
For technicians, this document works like a roadmap. Instead of blindly probing components, you can trace circuits logically and identify where the fault begins.
A quality schematic usually includes:
In real-world repairs, this information can save hours of troubleshooting.
Experienced repair professionals know that successful motherboard repair is all about precision. Modern laptop boards are too dense for trial-and-error methods.
Here’s why the NM-C101 Schematic Diagram matters so much.
When a Lenovo IdeaPad L340-15API arrives dead or liquid damaged, technicians need to identify missing voltages quickly. With the schematic, you can trace power rails step by step and determine exactly where the issue starts.
Instead of testing random components, you work methodically.
Laptop logic boards contain hundreds of tiny SMD components. A burned resistor or shorted capacitor may look insignificant but can completely disable the system.
The schematic helps identify:
That level of detail is critical during chip-level repair.
Repair businesses rely on efficiency and reputation. The faster you diagnose and repair boards correctly, the more customers trust your service.
Technicians using the NM-C101 Schematic Diagram often achieve:
While schematics are incredibly useful, most professionals combine them with additional repair tools and resources for better results.
Boardview software visually maps every component location on the motherboard. When used together with the NM-C101 Schematic Diagram, technicians can instantly locate resistors, capacitors, coils, and ICs physically on the board.
Popular boardview tools include:
No schematic is useful without proper testing equipment. A reliable multimeter helps verify:
A DC power supply also helps detect shorts and abnormal current draw during diagnostics.
Short circuits on laptop motherboards can be difficult to locate. Thermal cameras and freeze spray allow technicians to identify overheating components quickly.
Combined with schematic tracing, this dramatically speeds up repair work.

For tips on chip-level repair of laptop and desktop motherboards, visit our YouTube channel Repair Assistant and subscribe to our Facebook page repairassiastantbd for repair resource updates.
The Lenovo IdeaPad L340-15API is a sophisticated machine, and repairing its motherboard requires more than basic hardware skills. For serious laptop motherboard technicians, the NM-C101 Schematic Diagram is not just helpful — it’s practically essential.
It improves diagnostic accuracy, reduces repair time, and helps technicians perform professional-level chip repairs with confidence. When paired with boardview files, quality tools, and real-world troubleshooting experience, the schematic becomes one of the most valuable resources on any repair bench.
If you regularly work on Apple logic boards, keeping the NM-C101 Schematic Diagram in your repair toolkit can make a noticeable difference in both workflow and repair success.
If you’re serious about improving your chip-level repair skills, working alone will slow you down. That’s why joining a dedicated repair network makes a real difference.
Our community at:
👉 https://repaircommunity.thetechstall.com/
Gives you access to:
Instead of wasting hours searching for a single repair resource file in different places, join our repair community for free and request the file you want. Our tech support team will try to deliver it as quickly as possible. This is an effective way to improve quickly.