Why the MS-1482/MS-14821 Schematic Diagram Is the Ultimate Free Solution for Repairing MSI FX420 Laptop Motherboards
If you own or repair laptops, especially MSI FX420 models, you’ve likely encountered motherboard issues at some point. These problems often feel daunting because of the intricate layout and components involved in the motherboard’s circuitry. This is where the MS-1482/MS-14821 schematic diagram comes to the rescue. It’s the ultimate free resource that simplifies the repair process and helps users save time, money, and effort.
In this blog post, we’ll delve into why this schematic diagram is such a valuable asset, its features, and how it can help you troubleshoot your MSI laptop motherboard issues.
Understanding the MS-1482/MS-14821 Schematic Diagram
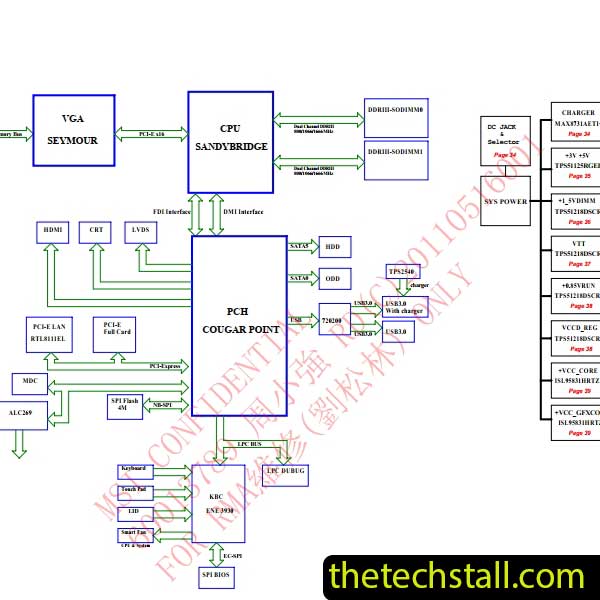
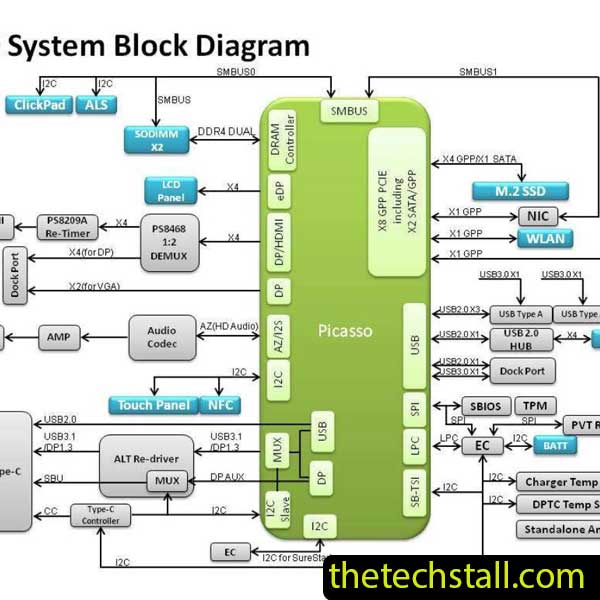
The MS-1482/MS-14821 schematic diagram is a detailed blueprint of the motherboard used in MSI FX420 laptops. It provides a comprehensive view of the electrical circuits, components, and interconnections, allowing technicians or DIY enthusiasts to pinpoint errors with precision.
This diagram isn’t just a technical tool; it’s a guide that empowers you to understand the motherboard’s functionality and locate faults effectively.
Why Choose the MS-1482/MS-14821 Schematic Diagram?
Here’s what makes this schematic diagram the go-to solution for MSI motherboard repairs:
1. Free and Accessible
One of the most significant advantages is that it’s entirely free. Repairing laptops can often be expensive, especially if you rely on third-party repair services.
2. Simplifies Troubleshooting
Whether you’re dealing with a power issue, malfunctioning ports, or dead chips, the schematic diagram simplifies the troubleshooting process. It identifies all components, such as resistors, capacitors, ICs, and voltage pathways, enabling you to locate and diagnose faults quickly.
3. Tailored for MSI FX420
While many general schematic diagrams exist, the MS-1482/MS-14821 is specifically designed for the MSI FX420 laptops. This specificity ensures that every detail aligns with your device, reducing confusion and errors during repairs.
4. Boosts DIY Repairs
For tech-savvy individuals who enjoy DIY repairs, this diagram is an invaluable tool. It eliminates the guesswork and makes it easier to understand complex motherboard structures.
5. Saves Time and Money
By offering a clear visual representation of the motherboard, the schematic diagram helps repairers save hours of trial and error. In turn, this reduces labor costs and ensures a faster turnaround for repairs.
How to Use the MS-1482/MS-14821 Schematic Diagram
Using this schematic diagram is straightforward if you’re equipped with basic tools and knowledge of electronics. Here’s a step-by-step guide:
- Download the Diagram: Ensure you get the MS-1482/MS-14821 schematic diagram from thetechstall.com.
- Identify the Problem Area: Determine which section of the motherboard is malfunctioning.
- Cross-Reference with the Diagram: Use the schematic to locate the specific components and connections involved in the issue.
- Test and Repair: With the help of a multimeter and soldering tools, troubleshoot and repair the faulty parts.
Common Problems Solved with the MS-1482/MS-14821 Schematic Diagram
The diagram has proven effective in resolving several issues common to MSI FX420 laptops, such as:
- Power Problems: Diagnosing and fixing issues related to charging circuits or power delivery.
- No Display Issues: Identifying problems with GPU or LCD connections.
- USB/HDMI Port Failures: Locating damaged pathways or faulty connectors.
- Component-Level Repairs: Replacing damaged resistors, capacitors, or ICs.
The MS-1482/MS-14821 schematic diagram is a game-changer for anyone looking to repair MSI FX420 laptop motherboards. Its accessibility, comprehensive details, and ease of use make it the ultimate free solution for troubleshooting and repairing motherboard issues.
Whether you’re a professional technician or a DIY enthusiast, this schematic diagram offers the clarity and precision needed to repair your device effectively.
By leveraging this powerful resource, you’ll not only save money but also gain valuable insights into the workings of your laptop’s motherboard.
Looking to download the schematic diagram? Start your repair journey today and experience the difference!