Mastering Lenovo ThinkPad E15 Laptop Motherboard Fixes with NM-C421 Rev 1.0 Schematic Diagram!
When it comes to laptop repairs, especially with a robust machine like the Lenovo ThinkPad E15, understanding the motherboard is crucial. The E15 is known for its reliability, but like all laptops, it can face hardware issues over time. One of the most effective tools for diagnosing and fixing these issues is the NM-C421 Rev 1.0 Schematic Diagram. In this blog post, we’ll walk you through mastering motherboard fixes using this schematic, ensuring your E15 runs smoothly for years to come.
Why the Lenovo ThinkPad E15?
The ThinkPad E15 is a powerhouse designed for professionals. With its high-performance specs, durable build, and security features, it’s a favorite among business users. However, as with any electronic device, it’s not immune to problems such as power issues, short circuits, and component failures. That’s where the NM-C421 Rev 1.0 schematic diagram comes into play.
What is the NM-C421 Rev 1.0 Schematic Diagram?
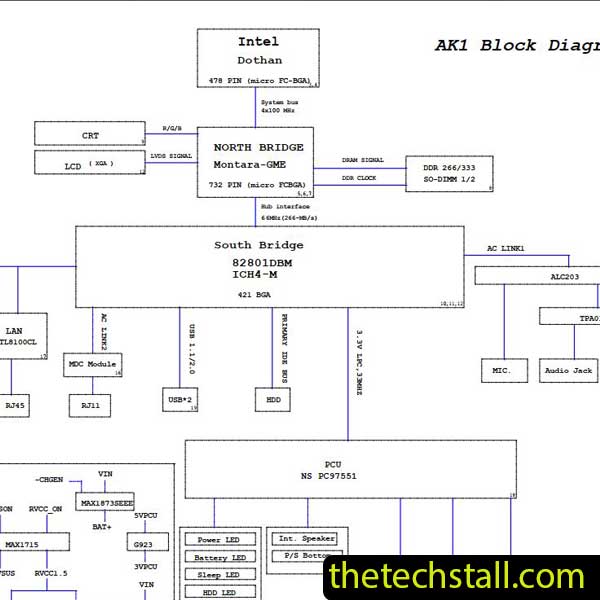
The NM-C421 Rev 1.0 is the schematic diagram for the Lenovo ThinkPad E15’s motherboard. This diagram is a blueprint that details every component, connection, and circuit on the motherboard. Understanding this schematic is vital for anyone looking to perform repairs or diagnose issues on their E15.
Key Sections of the NM-C421 Rev 1.0 Schematic:
- Power Supply Section: Outlines the power flow throughout the motherboard, helping diagnose power-related issues.
- CPU and GPU Sections: Critical for understanding the connections and signals related to the processing units.
- RAM and Storage: Details the memory and storage controllers, essential for troubleshooting boot issues.
- Peripheral Connections: Includes ports like USB, HDMI, and others that might need repair or replacement.
Common Motherboard Issues in the ThinkPad E15
Before diving into the schematic, it’s important to know the common issues that users face with the E15 motherboard:
- No Power Issue: Often due to a faulty power IC or short circuit in the power section.
- Overheating: Could be related to thermal paste issues, fan failures, or a malfunctioning power supply.
- Port Malfunctions: USB or HDMI ports may stop working due to physical damage or internal circuit issues.
- RAM Failure: Sometimes the laptop fails to recognize RAM due to faulty slots or controller issues.
“Looking to repair your Lenovo ThinkPad E15 laptop? Get the essential NM-C421 Rev 1.0 boardview file for free from this link. This file is crucial for accurate motherboard diagnostics and repairs, helping you troubleshoot issues effectively and restore your laptop’s performance.”
How to Use the NM-C421 Rev 1.0 Schematic Diagram for Repairs
Step 1: Identify the Problem
Start by diagnosing the issue. Is your E15 not powering on? Is it overheating? Once you have a basic understanding, you can refer to the relevant section of the NM-C421 Rev 1.0 schematic.
Step 2: Locate the Component
Using the schematic, find the component that might be causing the issue. For example, if the laptop isn’t powering on, check the power supply section of the schematic.
Step 3: Test the Component
Use a multimeter to test the identified component. For example, check for continuity, voltage levels, and resistance. Compare these readings with what’s expected according to the schematic.
Step 4: Replace or Repair
If the component is faulty, replace it with a new one. If it’s a minor issue, like a loose connection, simply repairing it might resolve the problem.
Step 5: Reassemble and Test
After making the necessary repairs, reassemble the laptop and test it thoroughly to ensure the issue is resolved.
Pro Tips for Mastering Motherboard Repairs
- Familiarize Yourself with Common Symbols: Schematic diagrams use standard symbols. Understanding these will make it easier to navigate.
- Use Quality Tools: Invest in a good quality multimeter, soldering iron, and other essential tools to ensure your repairs are effective.
- Keep the Workspace Clean: A clutter-free workspace helps prevent accidental damage to delicate components.
- Refer to the Schematic Often: Continuously cross-reference your findings with the schematic to avoid mistakes.
Download “Lenovo ThinkPad E15 NM-C421 Rev 1.0 Schematic Diagram” view – Downloaded 625 times – 82.77 KB
Mastering the Lenovo ThinkPad E15 motherboard repairs using the NM-C421 Rev 1.0 schematic diagram can save you time, money, and the frustration of a malfunctioning laptop. Whether you’re a professional technician or a DIY enthusiast, this schematic is your roadmap to successful repairs. By understanding the motherboard at this level, you ensure that your ThinkPad E15 remains a reliable companion for all your computing needs.
If you found this guide helpful, don’t forget to share it with your fellow tech enthusiasts! And if you have any questions or need further assistance, drop a comment below. Happy repairing! Join here to get help from the tech stall support team