Easily Troubleshoot ASUS Desktop Motherboard Issues Using the Free Gigabyte B450M-DS3H-V2 REV1.01 Schematic Diagram
When your GIGABYTE desktop starts acting up, it can be frustrating to pinpoint the root cause. Whether it’s random reboots, unresponsive USB ports, or audio problems, your motherboard could be the culprit. But don’t worry—troubleshooting these issues doesn’t have to be a daunting task, especially if you have the right tools at your disposal. One of the most valuable resources for tackling motherboard problems is the schematic diagram. Specifically, the Gigabyte B450M-DS3H-V2 REV1.01 schematic diagram is a free and incredibly useful tool that can help you identify and resolve issues with your GIGABYTE desktop motherboard.
What is the Gigabyte B450M-DS3H-V2 REV1.01 Schematic Diagram?
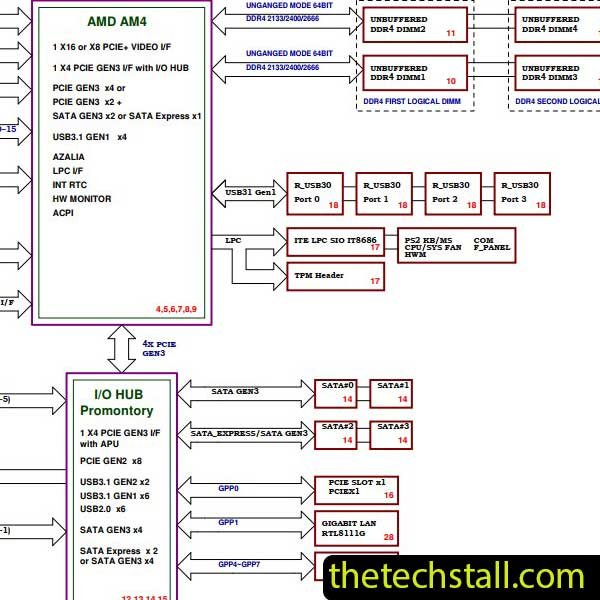
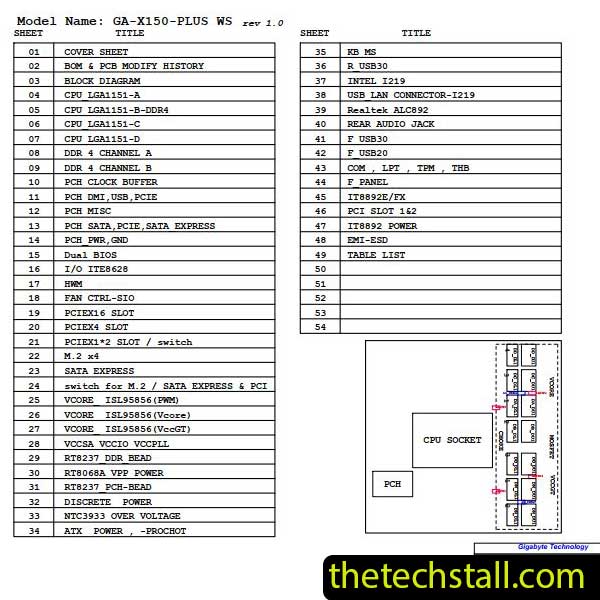
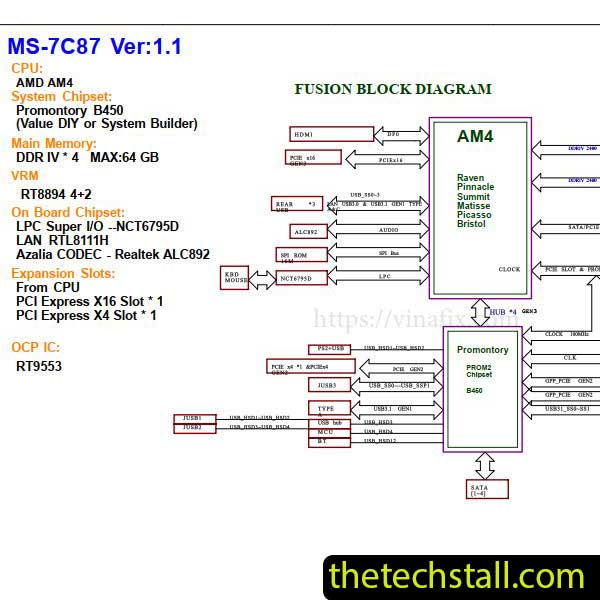
The Gigabyte B450M-DS3H-V2 REV1.01 schematic diagram is a detailed blueprint of the motherboard’s electrical pathways. It provides an intricate map of all the connections, components, and circuits on the motherboard, allowing you to see exactly how everything is connected. This can be incredibly helpful when trying to diagnose hardware issues, as it gives you a clear view of the motherboard’s design and layout.
Why do you need schematic diagrams?
When troubleshooting a motherboard issue, having a schematic diagram is like having a roadmap to your destination. It allows you to:
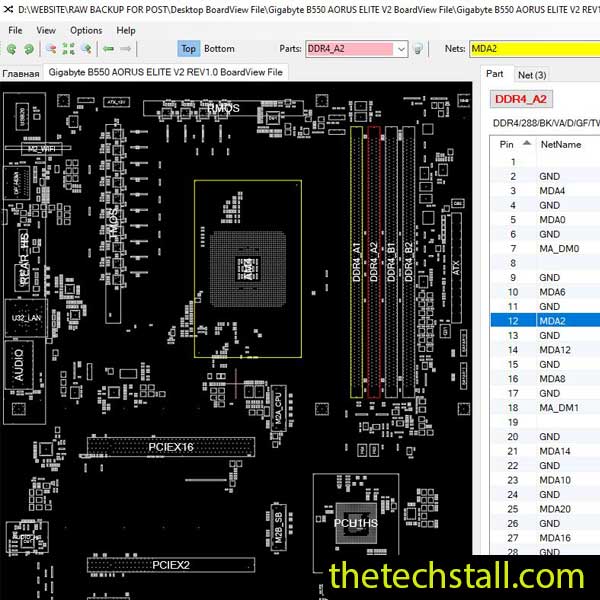
- Identify Faulty Components: With the schematic diagram, you can easily trace the connections to identify any components that may be malfunctioning. For example, if a USB port is not working, the diagram can show you which components and connections are involved, making it easier to diagnose the problem.
- Understand Circuit Layouts: Motherboards are complex, with many interconnected circuits. The schematic diagram breaks down these circuits, showing you how each one functions and interacts with others. This understanding can help you figure out why certain issues are occurring.
- Simplify Repairs: If you’re comfortable with DIY repairs, the schematic diagram is invaluable. It can guide you in replacing components, re-soldering connections, or making other repairs with precision.
- Save Time and Money: By using the schematic diagram to troubleshoot and repair your motherboard, you can avoid the hassle and cost of taking your computer to a repair shop. You’ll also save time by quickly identifying the problem rather than spending hours on trial-and-error troubleshooting.
Boardview files are essential for anyone involved in the repair and maintenance of desktop motherboards. These detailed schematics provide a visual representation of the motherboard’s circuitry, enabling technicians to identify component connections, trace faults, and perform precise repairs. By downloading free boardview files, repair professionals can save time and increase accuracy, making it easier to troubleshoot and fix issues without guesswork. This resource is invaluable for ensuring that every repair is executed with precision, ultimately extending the life of your hardware.
How to Use the Gigabyte B450M-DS3H-V2 REV1.01 Schematic Diagram
Using the Gigabyte B450M-DS3H-V2 REV1.01 schematic diagram is straightforward, even if you’re not an expert in electronics. Here’s a step-by-step guide:
- Download the Diagram: The first step is to download the Gigabyte B450M-DS3H-V2 REV1.01 schematic diagram from here.
- Familiarize Yourself with the Diagram: Before diving into troubleshooting, take some time to understand the different sections of the diagram. Familiarize yourself with the symbols and labels used to represent various components and connections.
- Start Troubleshooting: Begin by locating the area of the motherboard where the issue is occurring. Use the schematic diagram to trace the connections and identify any potential problems, such as broken circuits, faulty components, or incorrect connections.
- Make Repairs or Adjustments: Once you’ve identified the issue, use the diagram to guide your repairs or adjustments. Whether you’re replacing a component, re-soldering a connection, or making other modifications, the diagram will help ensure you’re working on the right area.
TechStall support team has an official Facebook page and a YouTube channel, from where you can get Desktop and laptop motherboard repair resource update information.
The Gigabyte B450M-DS3H-V2 REV1.01 schematic diagram is an essential tool for anyone looking to troubleshoot and repair their GIGABYTE desktop motherboard. It provides a detailed view of the motherboard’s layout, making it easier to identify and resolve issues quickly and efficiently. By using this free resource, you can save time, money, and the frustration of dealing with motherboard problems on your own.
Whether you’re a tech enthusiast or just someone trying to fix a pesky issue with your computer, the Gigabyte B450M-DS3H-V2 REV1.01 schematic diagram is your key to a smoother troubleshooting experience. Download it today and take the guesswork out of motherboard repairs.