Are you facing issues with your Dell Studio XPS 1340 laptop motherboard? Repairing a laptop motherboard can be a complex task, requiring a deep understanding of its components and circuitry. To effectively diagnose and fix the problems, having access to the IM3 Rev 3A schematic diagram is essential. In this article, we will explore why you need this schematic diagram for repairing the Dell Studio XPS 1340 laptop motherboard and how it can make the repair process smoother and more efficient.
Boardview files play a crucial role in the repair and troubleshooting process for laptop technicians. They offer a comprehensive view of the motherboard, allowing technicians to identify specific components, locate test points, and trace circuit paths. By referring to boardview files, technicians can efficiently diagnose hardware issues and plan the appropriate repair procedures.
The Dell Studio XPS 1340 laptop is a powerful and feature-rich device. However, like any electronic device, it can encounter hardware issues over time. When the motherboard malfunctions, it can disrupt the entire functionality of the laptop. Repairing the motherboard requires expertise in electronics and a detailed understanding of the circuitry.
Laptop motherboard repair involves diagnosing and fixing faults in the intricate network of components that make up the motherboard. These faults can range from power issues to faulty connections and damaged components. Repairing a laptop motherboard requires careful analysis and troubleshooting to identify the root cause of the problem.
A schematic diagram is a visual representation of the circuitry and connections within a device. It provides detailed information about the components, their interconnections, and the flow of signals and power. When it comes to repairing laptop motherboards, having access to the schematic diagram is crucial for several reasons:
A BIOS bin file is a vital resource for laptop repair, especially when dealing with BIOS corruption or bricked laptops. It provides technicians with a means to restore the BIOS to a functional state and revive the laptop. However, it’s important to exercise caution, ensure compatibility, and acquire BIOS bin files from reliable sources. With the right BIOS bin file and expertise, technicians can effectively resolve BIOS-related issues and bring laptops back to life.
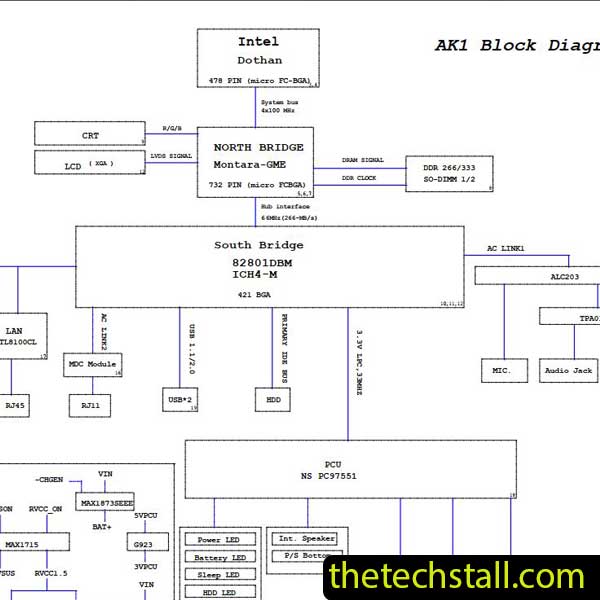
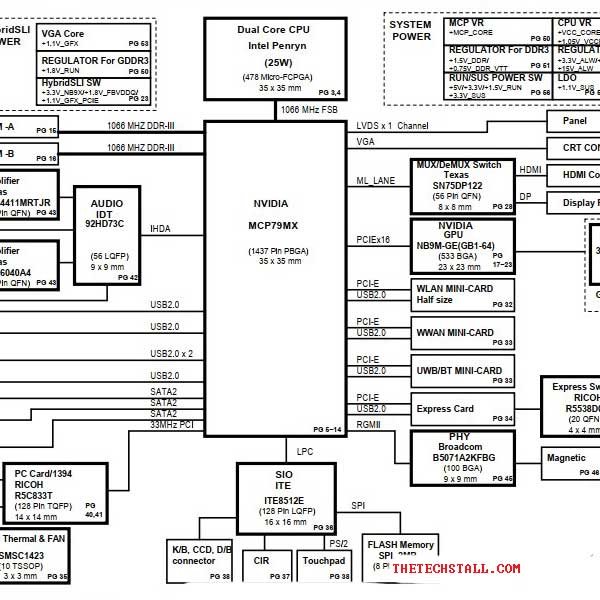
The IM3 Rev 3A schematic diagram is specifically designed for the Dell Studio XPS 1340 laptop motherboard. It provides a detailed layout of the motherboard’s circuitry, including component placement and connections. This particular schematic diagram is widely used by technicians and repair professionals due to its accuracy and reliability
Schematic diagrams play a crucial role in the repair process of laptop motherboards. Let’s delve into how they aid in repairing these intricate electronic components:
When a laptop motherboard encounters an issue, it can be challenging to pinpoint the exact component causing the problem. However, with a schematic diagram in hand, technicians can follow the circuit paths and identify potential faulty components. By analyzing the diagram and understanding the connections, they can narrow down the search and focus on the specific areas where the problem may lie.
Repairing a motherboard involves understanding how signals and power flow through the circuitry. Schematic diagrams provide a roadmap for technicians to trace the circuit paths, helping them analyze the signal flow and locate critical points for testing. This tracing process aids in identifying any breaks or interruptions in the circuit, allowing technicians to fix the issue accurately.
Each component on a laptop motherboard has specific pin configurations and voltage requirements. Schematic diagrams provide detailed information about these configurations, enabling technicians to ensure that each component is properly connected and receiving the correct voltage. This information is invaluable for diagnosing power-related issues and preventing further damage to the motherboard.
Top 10 Brands Laptop Schematic Diagram PDF Free Download
Top 9 Brands Laptop BoardView File Free Download
The IM3 Rev 3A schematic diagram for the Dell Studio XPS 1340 laptop motherboard, You can download from the link given below.
In conclusion, having access to the IM3 Rev 3A schematic diagram is crucial when it comes to repairing the Dell Studio XPS 1340 laptop motherboard. Schematic diagrams provide a visual representation of the circuitry, helping technicians troubleshoot and diagnose issues more effectively.
By using the schematic diagram, technicians can identify faulty components, trace circuit paths, analyze signal flow, and ensure proper pin configuration and voltage requirements. This detailed understanding of the motherboard’s circuitry greatly enhances the repair process and increases the chances of a successful repair.
Remember to take necessary precautions and follow safety measures when repairing laptop motherboards. Working with sensitive electronic components requires static electricity protection, proper tools, and careful documentation of the disassembly process.
If you lack the technical expertise or feel uncertain about the repair process, it is advisable to seek professional assistance. This will help prevent further damage to the motherboard and ensure your safety.
Repairing a laptop motherboard can be a challenging task, but with the aid of the IM3 Rev 3A schematic diagram and proper expertise, you can restore your Dell Studio XPS 1340 laptop back to its optimal functioning state.
1. Can I use any schematic diagram for repairing the Dell Studio XPS 1340 laptop motherboard? It is recommended to use the specific IM3 Rev 3A schematic diagram designed for the Dell Studio XPS 1340 model. This ensures accuracy and compatibility with the motherboard’s circuitry.
2. What precautions should I take when working on a laptop motherboard? To ensure safety and prevent damage, use an anti-static wrist strap or mat to protect against electrostatic discharge. Power off the laptop and discharge capacitors before starting any repairs. Use proper tools, document the disassembly process, and label cables and screws for reassembly.
3. What if I don’t have the technical expertise to repair the motherboard myself? If you lack technical expertise or feel unsure about the repair process, it is advisable to seek professional assistance. Professional technicians have the necessary skills and experience to handle complex motherboard repairs.
4. Can a faulty motherboard be repaired, or is replacement necessary? In many cases, a faulty motherboard can be repaired by replacing the faulty components or fixing the underlying issues. However, there may be instances where a motherboard replacement is more cost-effective or necessary, depending on the severity of the damage.
Share with friends