If you’ve ever spent hours tracking down a faulty power rail or chasing an intermittent short on a ASUS X555DG motherboard, you already know how valuable the right repair documents can be. Instead of relying on trial and error, experienced technicians use board-specific resources to diagnose problems faster and with greater confidence.
One of the most valuable resources available for this motherboard is the X55DA Schematic Diagram. Whether you’re repairing a laptop that won’t power on, has charging problems, or suffers from display or USB failures, this schematic helps you understand how every major circuit is connected. It turns complex troubleshooting into a more organized and efficient process.
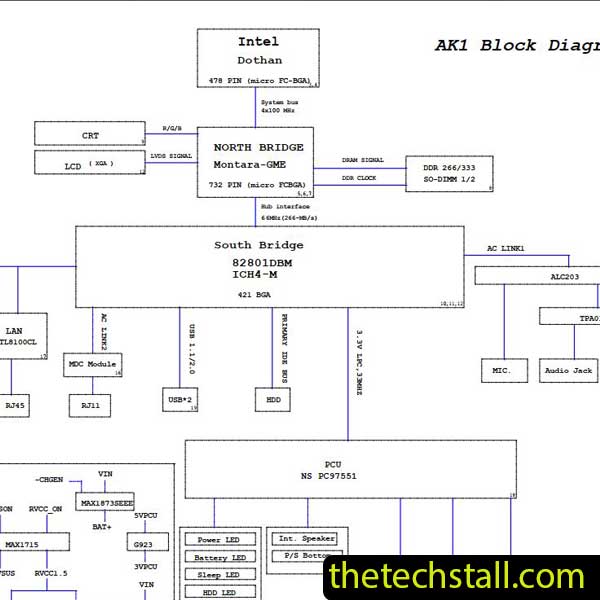
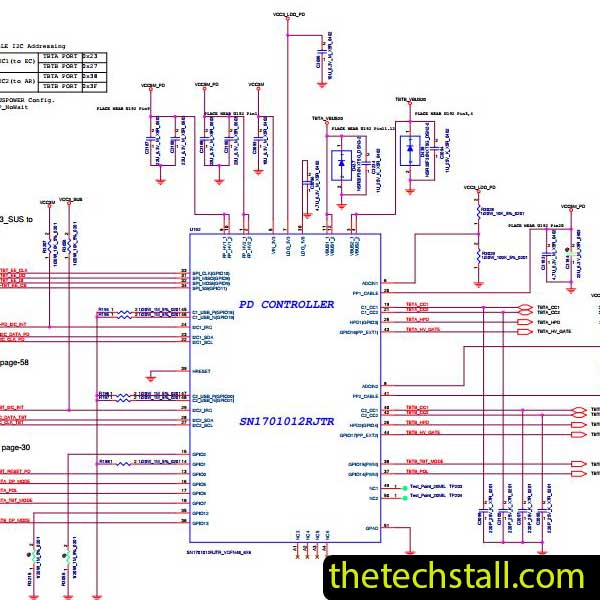
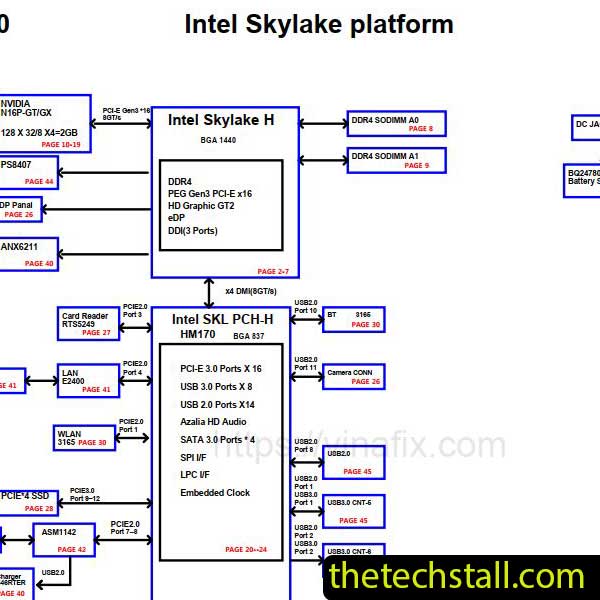
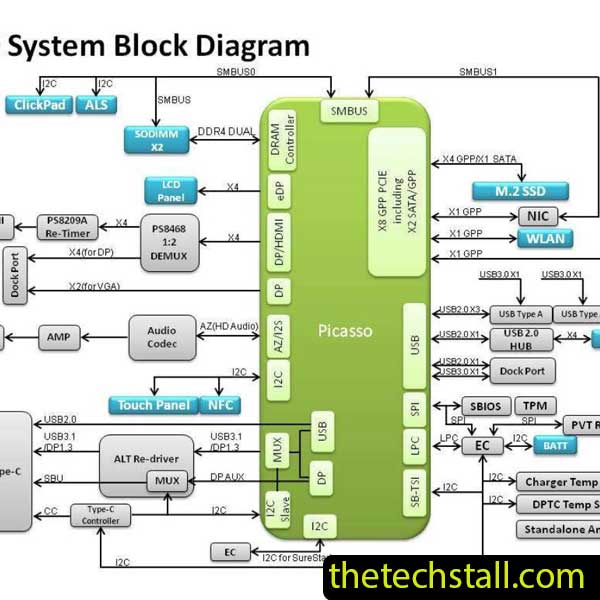
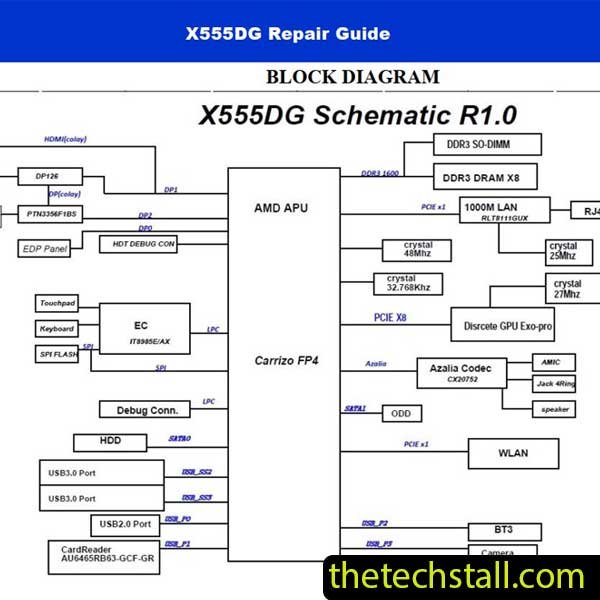
The X55DA Schematic Diagram is a detailed electronic circuit document created specifically for the ASUS X555DG laptop motherboard. It maps the electrical connections between integrated circuits, MOSFETs, resistors, capacitors, inductors, connectors, and power management components.
Instead of guessing where a signal should travel, technicians can follow the exact path shown in the schematic. This makes fault isolation much quicker, especially during chip-level motherboard repair.
Whether you’re diagnosing a dead motherboard or tracking down a missing voltage, the schematic provides the information needed to work accurately and avoid unnecessary component replacement.
Modern laptops are packed with high-density components and multilayer PCB designs. Without proper documentation, identifying a faulty component can become frustrating and time-consuming.
The X55DA Schematic Diagram helps technicians:
Having this information readily available often reduces repair time while increasing the likelihood of a successful fix.
The ASUS X555DG is a high-performance laptop, but like any complex electronic device, its motherboard can develop faults over time. The X55DA Schematic Diagram is particularly useful when diagnosing issues such as:
Instead of replacing expensive components without certainty, technicians can use the schematic to verify each circuit before making repairs.
Although the schematic is incredibly useful on its own, combining it with additional repair files creates a much more effective troubleshooting workflow.
A BoardView file displays the physical location of every component on the motherboard. After identifying a faulty part in the schematic, the BoardView allows you to find its exact position on the PCB within seconds.
Using both resources together saves valuable repair time and minimizes errors.
If the laptop experiences boot failure, BIOS corruption, or firmware-related issues, a compatible BIOS dump can be essential. After confirming the BIOS circuit with the schematic, technicians can safely reprogram or replace the firmware.
Datasheets provide detailed information about individual ICs, including pin configurations, operating voltages, internal block diagrams, and electrical characteristics. When paired with the X55DA Schematic Diagram, they make advanced diagnostics much easier.
Many experienced repair technicians document successful repairs, common failure points, voltage readings, and troubleshooting tips. These repair notes can significantly reduce diagnosis time when dealing with recurring motherboard faults.
Even the best repair documentation requires accurate measurements. A quality digital multimeter helps verify resistance, continuity, and voltage levels, while an oscilloscope allows technicians to analyze clock signals, communication lines, and waveform integrity.
Professional motherboard technicians rely on proper documentation because it delivers real advantages during repair.
Some of the biggest benefits include:
For beginners, the schematic also serves as an excellent learning tool, helping them understand how laptop motherboard circuits function in real-world repair situations.

For tips on chip-level repair of laptop and desktop motherboards, visit our YouTube channel Repair Assistant and subscribe to our Facebook page repairassiastantbd for repair resource updates.
Looking for the X55DA Schematic Diagram? You can download it for free using the link provided below.
Chip-level motherboard repair requires patience, technical knowledge, and reliable documentation. The X55DA Schematic Diagram provides technicians with the detailed circuit information needed to diagnose complex motherboard faults accurately and efficiently.
Whether you’re repairing charging problems, power failures, missing voltages, BIOS issues, or signal-related faults on the ASUS X555DG motherboard, this schematic can become one of the most valuable resources in your repair toolkit. Pair it with the matching BoardView file, BIOS dump, component datasheets, and repair notes to streamline your workflow and improve repair success.
If you’re serious about improving your chip-level repair skills, working alone will slow you down. That’s why joining a dedicated repair network makes a real difference.
Our community at:
👉 https://repaircommunity.thetechstall.com/
Gives you access to:
Instead of wasting hours searching for a single repair resource file in different places, join our repair community for free and request the file you want. Our tech support team will try to deliver it as quickly as possible. This is an effective way to improve quickly.