When repairing laptop motherboards, having access to the correct schematic diagram can make the difference between a successful repair and endless trial and error. For technicians who work with ASUS ROG GX550LXS laptops, the GX550LWS Schematic Diagram is one of the most valuable resources you can use to diagnose, analyze, and fix a wide range of motherboard faults quickly and efficiently.
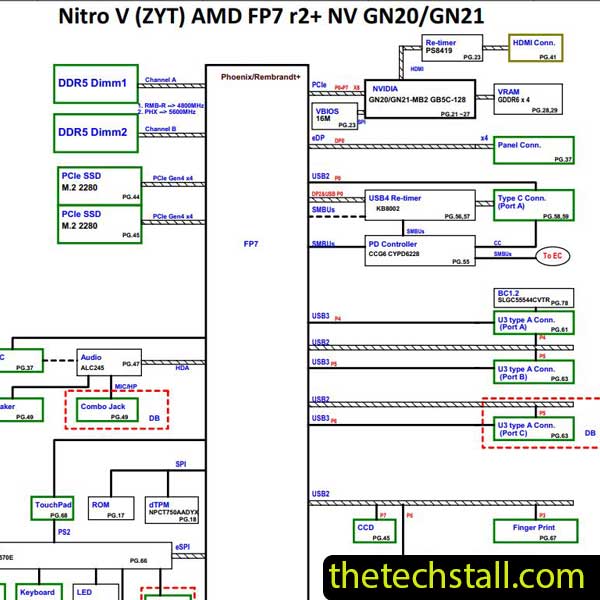
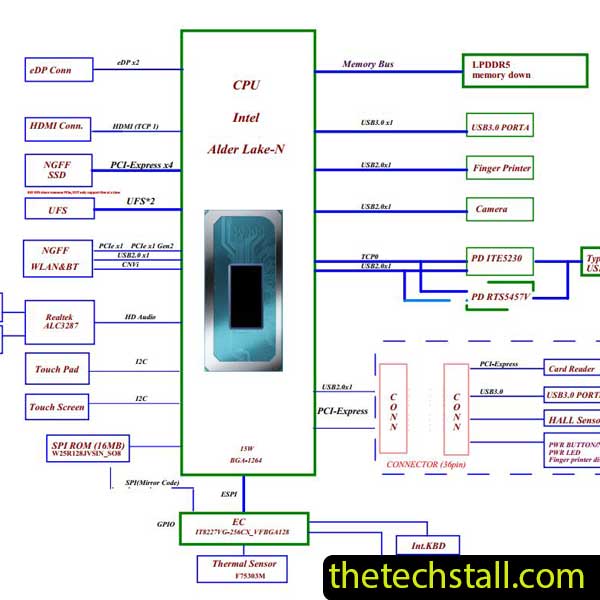
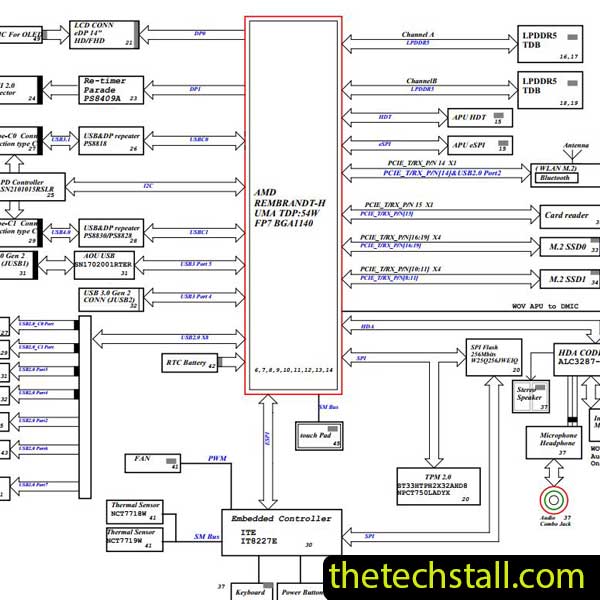
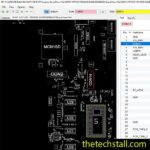
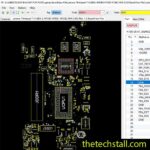
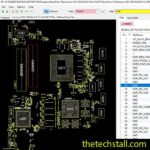
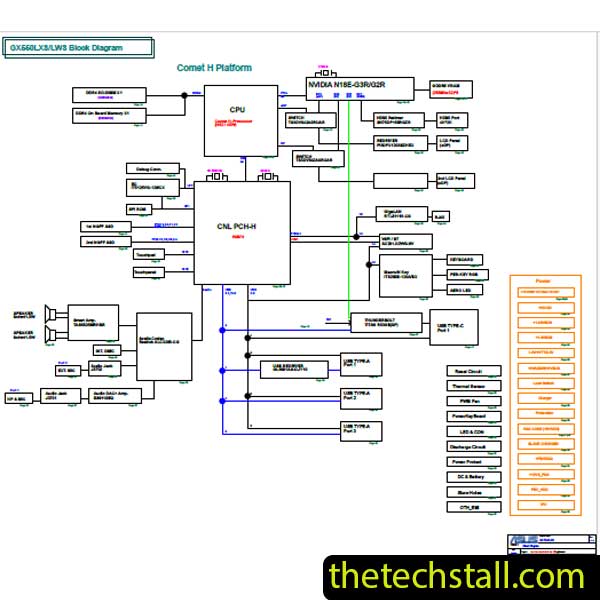
The GX550LWS Schematic Diagram is the official circuit layout blueprint used in the ASUS ROG GX550LXS series laptops. It shows every component on the motherboard — from power rails and MOSFETs to ICs, resistors, capacitors, and signal paths. This file allows you to trace the flow of current, locate faulty components, and understand how each section of the motherboard interacts with others.
For laptop motherboard technicians, this schematic acts as a roadmap. Instead of guessing why a laptop won’t power on or why the charging circuit fails, you can follow the schematic to pinpoint the exact section causing the issue.
When you work on an ASUS ROG GX550LXS motherboard, you’ll often face issues such as:
Without a schematic, diagnosing these faults can take hours. However, with the GX550LWS schematic, you can:
This saves time, improves accuracy, and ensures that your repair process is efficient and professional.
The detailed component labeling and voltage test points in the GX550LWS schematic make it easy to follow logical diagnostic steps.
To maximize your repair accuracy, pair the schematic with additional resources such as:
A boardview file provides the physical layout of the motherboard, showing exact component locations and connections. Use it alongside the schematic to identify and locate parts on the actual board.
A corrupted BIOS is a common cause of boot failures. Having the correct BIOS dump allows you to reprogram or replace the BIOS chip when needed.
Tools such as a digital multimeter, oscilloscope, and thermal camera can work hand in hand with the schematic to analyze power lines, detect shorts, and confirm signal activity.
Whether you’re an independent technician or part of a service center, mastering the use of the GX550LWS schematic diagram elevates your repair quality and saves significant time.
If you’re ready to start repairing ASUS ROG GX550LXS motherboards like a pro, you can download the GX550LWS Schematic Diagram using the link below. It’s your essential guide to tracing, testing, and fixing faults at the component level. With this schematic in your toolkit, you’ll be able to repair complex motherboard issues confidently — just like an experienced technician.
Download “ASUS ROG GX550LXS GX550LWS REV 2.0 Schematic Diagram” view – Downloaded 252 times – 49.39 KBThe GX550LWS Schematic Diagram transforms ASUS ROG GX550LXS motherboard repair from guesswork into a structured, scientific process. By understanding the power sequence and using the schematic to trace signals for common faults like no power, no display, and failed USB ports, you can diagnose with confidence. When you combine this powerful diagram with Boardview files, datasheets, and a methodical approach, you’re not just fixing a laptop—you’re demonstrating a master-level technical skill.

For tips on chip-level repair of laptop and desktop motherboards, visit our YouTube channel Repair Assistant and subscribe to our Facebook page repairassiastantbd for repair resource updates.
Ready to put this guide into action? Having the correct and clear schematic is the first and most crucial step.