Effortlessly Repair Your ASROCK H61M-VS R2.00 Desktop Motherboard with the 70-MXGKH0-A13 BoardView File
Is your ASROCK H61M-VS R2.00 desktop motherboard causing you headaches? Repairing it might seem daunting, but with the right tools and resources, you can make the process much more manageable. One essential tool in your repair toolkit should be the 70-MXGKH0-A13 BoardView file. This guide will walk you through the steps to effortlessly repair your ASROCK H61M-VS R2.00 motherboard using this crucial file.
Understanding the ASROCK H61M-VS R2.00 Motherboard
The ASROCK H61M-VS R2.00 is a compact and efficient motherboard designed for small form factor PCs. Despite its small size, it packs a punch with features that cater to both everyday computing needs and more demanding tasks. However, like any hardware, it can encounter issues over time.
The Importance of the 70-MXGKH0-A13 BoardView File
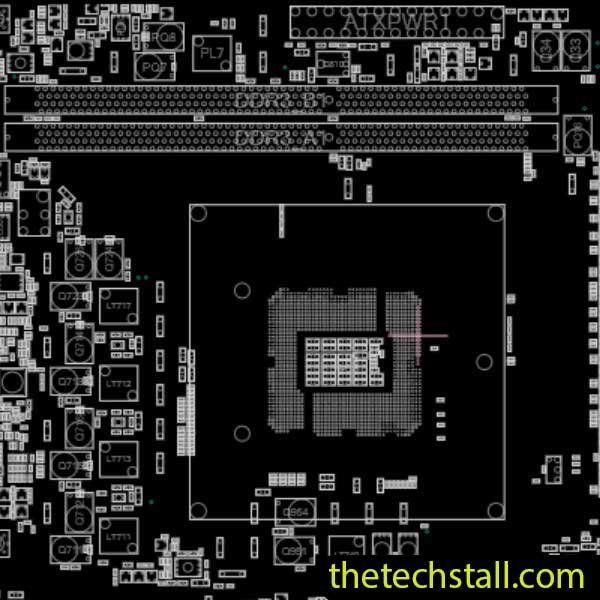
The 70-MXGKH0-A13 BoardView file is an invaluable resource when it comes to motherboard repair. This file provides a detailed map of your motherboard’s components, including their positions and connections. With this file, you can quickly identify problematic areas, trace circuits, and understand the layout of your motherboard, making the repair process significantly more straightforward.
Steps to Repair Your ASROCK H61M-VS R2.00 Motherboard with 70-MXGKH0-A13 BoardView file
1. Gather Your Tools
Before you begin, make sure you have all the necessary tools:
- Screwdrivers (Phillips and flathead)
- Anti-static wrist strap
- Multimeter
- Soldering iron and solder
- Thermal paste
- The 70-MXGKH0-A13 BoardView file
2. Diagnose the Problem
Start by diagnosing the issue. Common problems include no power, random shutdowns, and unresponsive peripherals. Use the multimeter to check for power at various points on the motherboard. Refer to the 70-MXGKH0-A13 BoardView file to understand where to test and what values to expect.
3. Locate Faulty Components
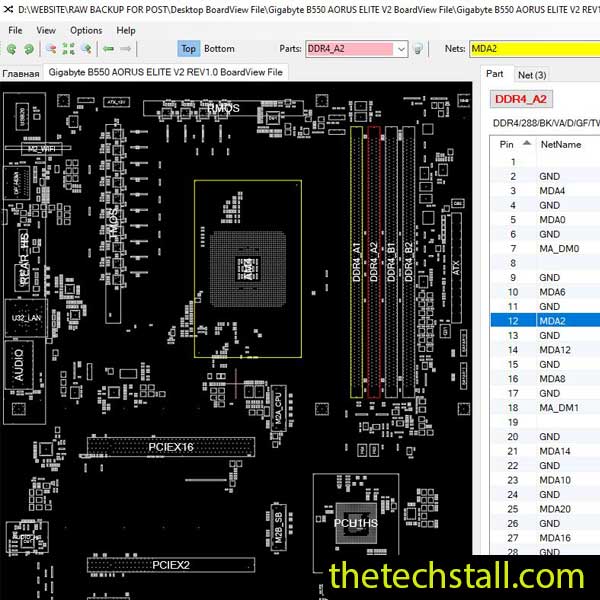
With the BoardView file, locate the faulty components on the motherboard. This file will help you identify the specific parts that need attention. Look for burnt or damaged components, loose connections, or signs of corrosion.
4. Replace or Repair Components
If you find a faulty component, you can either replace it or repair it. For replacement, make sure to use components that are compatible with your motherboard. If you need to solder, take care to avoid damaging surrounding components.
5. Reassemble and Test
Once you’ve made the necessary repairs, reassemble your motherboard. Apply new thermal paste to the CPU if you had to remove the heatsink. Power on your system and test to ensure everything is working correctly. Check all connections and run your computer for a while to confirm the issue is resolved.
6. Prevent Future Issues
To prevent future problems, keep your motherboard clean and free of dust. Regularly check connections and ensure your PC is in a well-ventilated area to avoid overheating.
Download “ASROCK H61M-VS R2.00 70-MXGKH0-A13 BoardView File” view – Downloaded 612 times – 90.35 KB
Repairing your ASROCK H61M-VS R2.00 desktop motherboard doesn’t have to be a daunting task. With the 70-MXGKH0-A13 BoardView file, you have a detailed guide to help you navigate the intricate layout of your motherboard. Follow these steps, and you’ll be well on your way to a successful repair, saving you time and money.
By using the right resources and taking a methodical approach, you can extend the life of your motherboard and keep your PC running smoothly. Happy repairing!
you might also like this