For laptop motherboard technicians working in the global repair industry, accurate documentation is the backbone of successful chip-level diagnostics. When dealing with Lenovo IdeaCentre A700 motherboard issues, one technical resource stands out as essential: the Calpella schematic diagram. This schematic is not just a wiring map—it is a powerful repair guide that helps technicians diagnose faults faster, reduce guesswork, and significantly improve repair outcomes.
In this blog, we will explore how laptop technicians can use the Calpella schematic diagram to fix Lenovo IdeaCentre A700 motherboard problems efficiently, save repair costs, reduce turnaround time, and enhance professional repair skills.
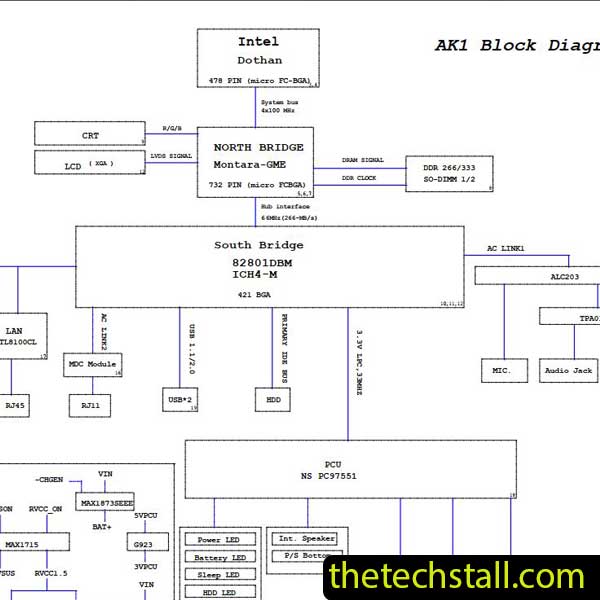
The Lenovo IdeaCentre A700 series uses the Calpella motherboard platform, which is widely known among chip-level repair professionals. Like many business-class laptops, the Lenovo IdeaCentre A700 often suffers from common motherboard faults such as:
Without a schematic, troubleshooting these issues becomes risky and time-consuming. This is where the Calpella schematic diagram becomes a must-have resource for technicians.
A schematic diagram shows how every component on the motherboard is connected electrically. For chip-level technicians, this means clarity and confidence during repairs.
Using the Calpella schematic diagram, you can:
Instead of randomly replacing parts, technicians can follow a logical diagnostic path, which dramatically improves success rates.
One of the most common Lenovo IdeaCentre A700 problems is a dead or no-power condition. With the Calpella schematic diagram, technicians can quickly locate:
By measuring voltages at defined test points shown in the schematic, faults can be isolated within minutes. Similarly, no-display problems can be diagnosed by checking LCD power rails, GPU signals, and BIOS-related circuitry.
Replacing an entire motherboard is expensive and often unnecessary. Chip-level repair using the Calpella schematic diagram allows technicians to fix only the faulty component.
Benefits include:
For independent repair shops and freelance technicians, these advantages directly impact business growth.
Technicians who regularly use schematic diagrams develop stronger analytical skills. The Calpella schematic diagram helps you understand real-world circuit design, power sequencing, and fault logic.
Over time, this knowledge translates into:
Mastering one schematic also makes it easier to understand other laptop motherboard designs.
While the schematic is essential, combining it with other repair resources maximizes effectiveness:
When used together with the Calpella schematic diagram, these tools create a complete professional repair setup.
To get the most value from the schematic:
These habits reduce repeat failures and protect sensitive components.
For technicians who want to enhance their Lenovo IdeaCentre A700 repair workflow, having quick access to the schematic is essential.
Download “Lenovo Idea Centre A700 Catalina Calpella Rev SA schematic” Lenovo-Idea-Centre-A700-Catalina-Calpella-Rev-SA-schematic.zip – Downloaded 389 times – 1.47 MBIn the competitive global laptop repair industry, technical accuracy separates average technicians from true professionals. The Calpella schematic diagram is a powerful tool that enables Lenovo IdeaCentre A700 motherboard repairs at the chip level with confidence, efficiency, and precision. By combining this schematic with proper tools and repair resources, technicians can save time, reduce costs, and continuously improve their repair skills.

For tips on chip-level repair of laptop and desktop motherboards, visit our YouTube channel Repair Assistant and subscribe to our Facebook page repairassiastantbd for repair resource updates.
Whether you are a beginner or an experienced motherboard technician, mastering the Calpella schematic diagram is a smart investment in your technical future.