A GPU Technician’s Guide: The Importance of the GV-N3090-EAGLE-24GD GA102-DT Schematic Diagram in Gigabyte RTX3090 Repairs
When it comes to repairing GPUs, especially for models like the Gigabyte RTX3090, understanding and utilizing schematic diagrams is crucial. Among these, the GV-N3090-EAGLE-24GD GA102-DT schematic diagram stands out as an indispensable resource. But why is this particular diagram so important? Let’s dive into its significance and how it can be a game-changer in your repair process.
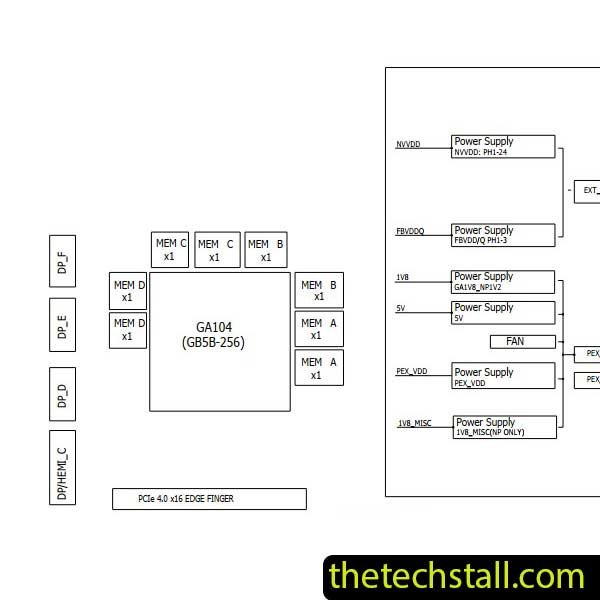
What is the GV-N3090-EAGLE-24GD GA102-DT Schematic Diagram ?
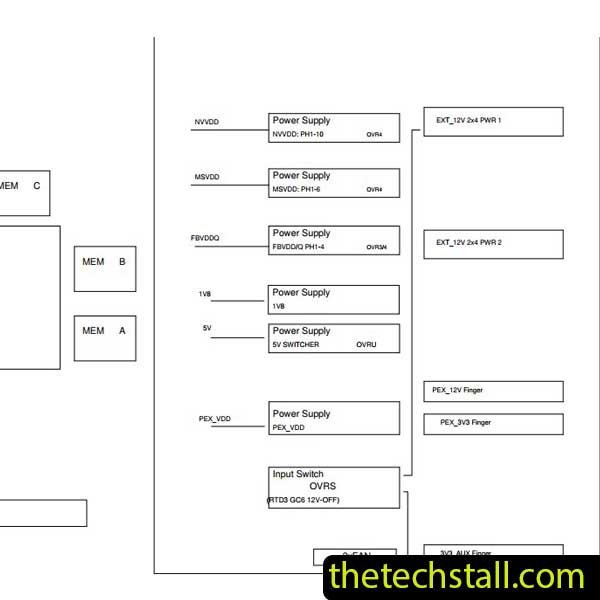
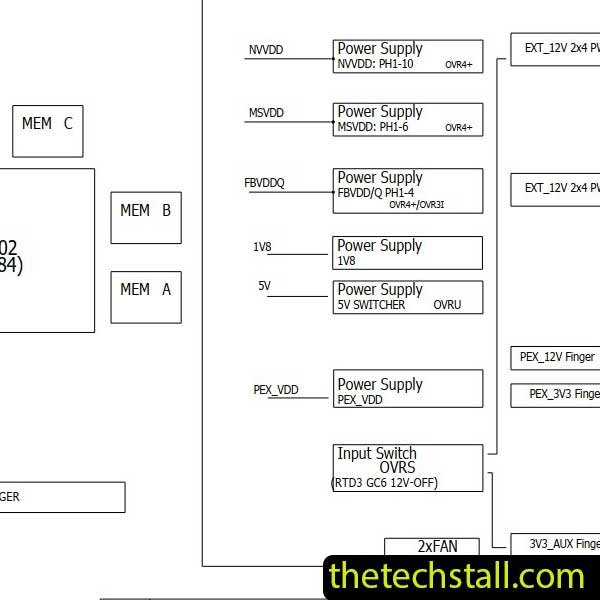
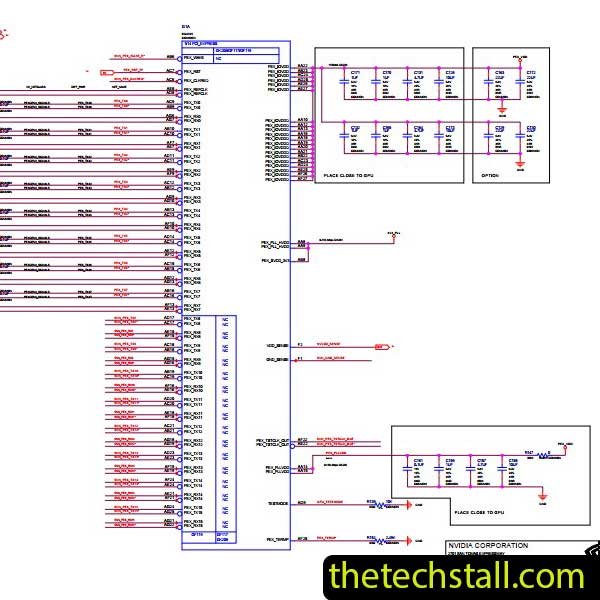
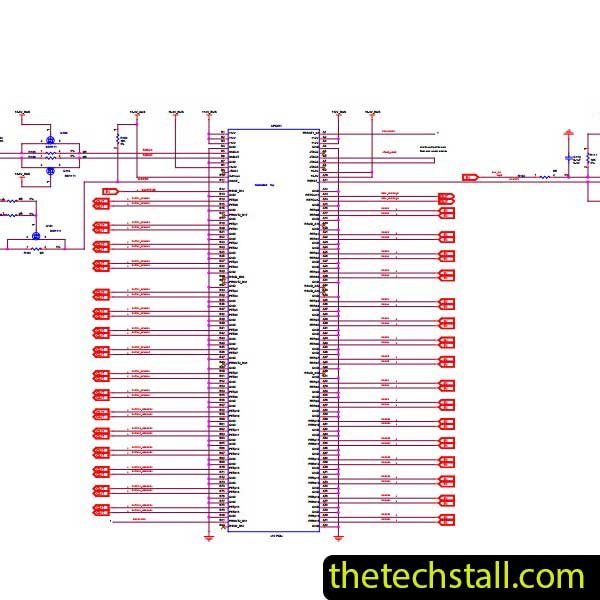
The GV-N3090-EAGLE-24GD GA102-DT schematic diagram is a detailed blueprint of the Gigabyte RTX3090’s circuitry. It provides a visual representation of the electrical connections and components within the GPU. For technicians, this diagram is like a map, guiding them through the complex network of circuits to identify issues and implement repairs efficiently.
Why This Diagram is Essential for Repairs
Accurate Fault Diagnosis One of the biggest challenges in GPU repairs is diagnosing the fault correctly. The schematic diagram allows technicians to trace the pathways of signals and power. This means you can pinpoint exactly where the fault lies, whether it’s a broken connection, a faulty capacitor, or an issue with a voltage regulator.
Efficient Component Replacement Once a fault is identified, the next step is replacing the defective component. The schematic diagram shows the exact type and value of each component, ensuring that replacements are precise. This accuracy reduces the risk of further damage and increases the chances of a successful repair.
Time-Saving Tool Time is money, especially in repair services. The schematic diagram helps technicians save valuable time by providing a clear and concise overview of the GPU’s circuitry. Instead of spending hours guessing where the problem might be, technicians can go straight to the source, perform the necessary repairs, and move on to the next job.
If you are a skilled Graphics Card(GPU) technician then you must know that Graphics Card(GPU) BoardView File is very important like Schematic Diagram. With your repair in mind, the Tech Stall team has made their collection of BoardView Files available for free download at thetechstall.com.
How to Use the GV-N3090-EAGLE-24GD GA102-DT Schematic Diagram
Familiarize Yourself with the Layout: Start by understanding the overall layout of the schematic. Identify the main components like the GPU core, memory chips, and power sections.
Trace Signal Paths: Follow the signal paths from the GPU core to other components. Look for inconsistencies or breaks in the pathways that could indicate faults.
Check Power Distribution: Ensure that power is being correctly distributed to all parts of the GPU. The diagram will show where voltage regulators are placed and how power flows through the circuit.
Cross-Reference with Actual Hardware: Use the schematic in conjunction with the physical GPU. This will help you correlate the diagram with real-world components, making it easier to identify and fix issues.
The GV-N3090-EAGLE-24GD GA102-DT schematic diagram is more than just a technical document; it’s a vital tool for any GPU technician working on the Gigabyte RTX3090. By providing a clear and detailed view of the GPU’s inner workings, it enables precise fault diagnosis, efficient repairs, and continuous learning. Whether you’re a seasoned professional or just starting, mastering this schematic will undoubtedly enhance your repair skills and improve your success rate.
If you found this guide helpful, feel free to share it with others facing similar issues with their Graphics Card! Join here to get help from the techstall support team