Laptop repair, especially chip-level troubleshooting, requires precision and technical know-how. If you’re working on an Monster ABRA A5 laptop, you’ll need both expertise and the right tools to identify and fix motherboard issues effectively. One invaluable resource that skilled technicians swear by is the CML-H+N18P-G62 GK5MP5X Schematic Diagram, which can make complex repairs much more manageable.
In this blog, we’ll discuss how to diagnose and fix common chip-level issues in the Monster ABRA A5 laptop and why the CML-H+N18P-G62 GK5MP5X Schematic Diagram is an essential tool for the job. If you’re a laptop repair technician or an enthusiast, this guide will help you approach repairs with confidence.
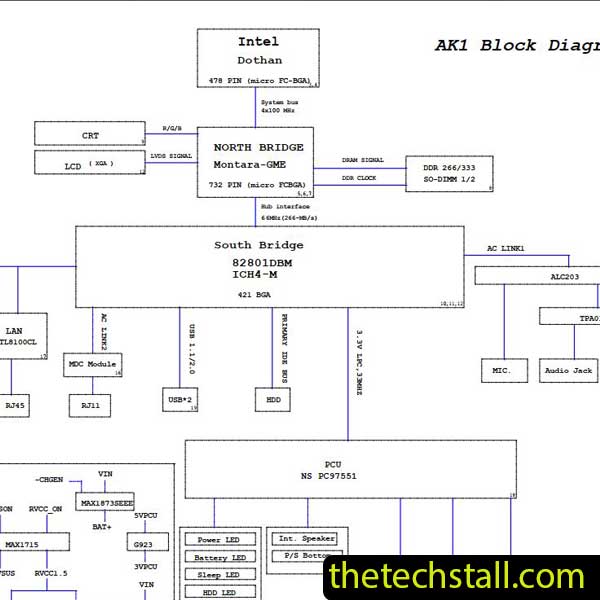
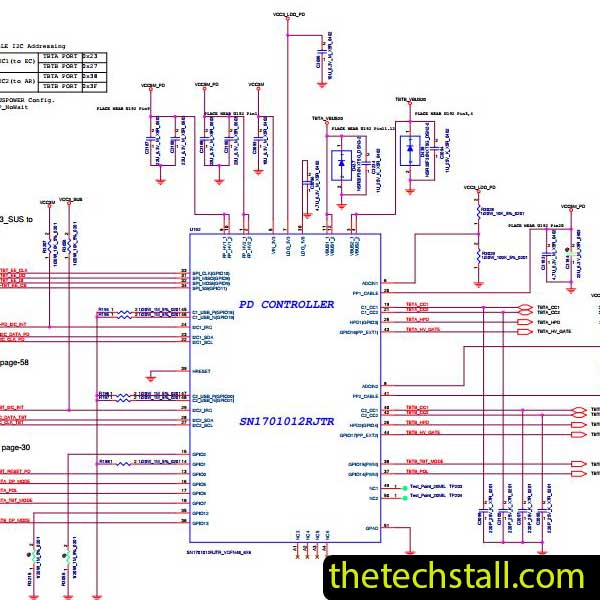
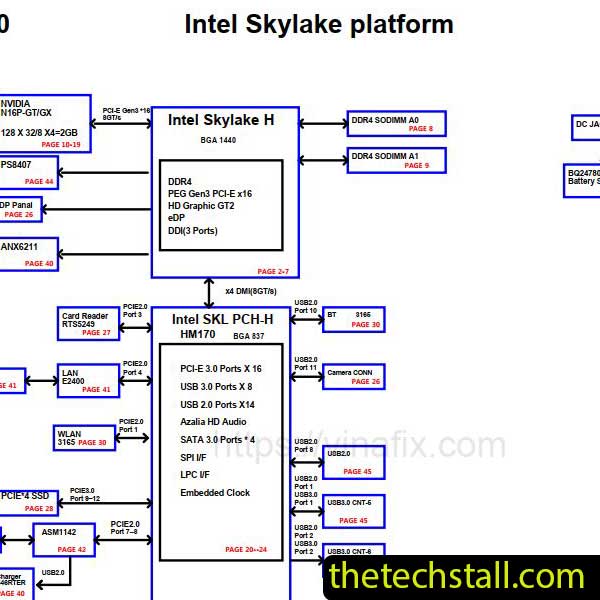
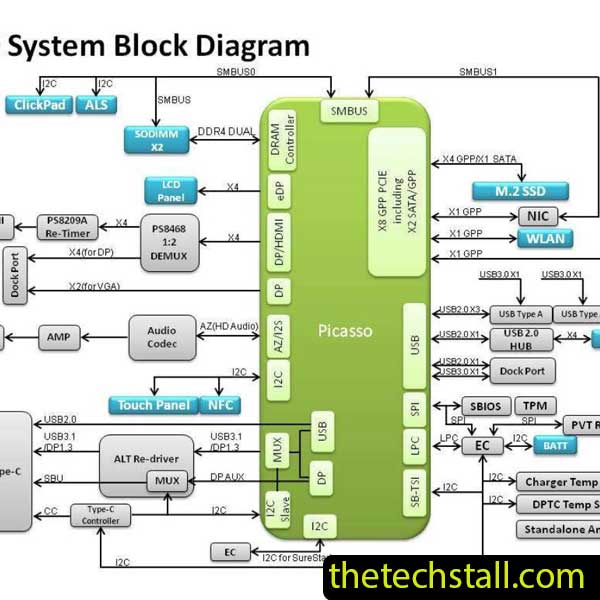
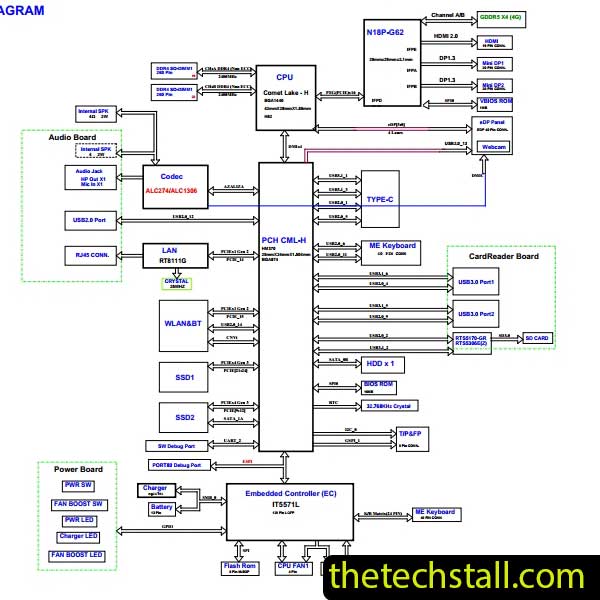
The CML-H+N18P-G62 GK5MP5X Schematic Diagram is a detailed blueprint of the Monster ABRA A5 motherboard. It maps out every connection, circuit, and component, allowing technicians to follow signal paths and identify faults.
Key benefits of using the CML-H+N18P-G62 GK5MP5X Schematic Diagram include:
The schematic diagram is particularly useful for troubleshooting power-related issues and diagnosing failures in key components like the GPU, CPU, and RAM.
If your Monster ABRA A5 doesn’t power on, the issue could lie in the power rail or DC jack. Use a multimeter to measure voltage levels at different points on the motherboard.
How the schematic helps:
With the CML-H+N18P-G62 GK5MP5X Schematic Diagram, you can trace the power input from the DC jack to the battery charging IC and beyond. Check for damaged capacitors, resistors, or MOSFETs in the circuit.
If the laptop powers on but doesn’t display anything on the screen, the problem might be related to the GPU, BIOS, or display circuits.
Steps to fix:
How the schematic helps:
The diagram provides the exact pinouts for display connectors and GPU power lines, making it easy to identify faults.
Short circuits on the motherboard can cause components to heat up or fail entirely.
Steps to fix:
How the schematic helps:
By using the CML-H+N18P-G62 GK5MP5X Schematic Diagram, you can follow the current path and pinpoint where the short circuit occurs.
Damaged USB or charging ports can cause connectivity issues or prevent the laptop from charging.
How to diagnose:
How the schematic helps:
The schematic provides the exact wiring diagram for USB and charging ports, enabling you to test and repair these circuits.
No matter how experienced you are, motherboard repairs can be challenging without a clear understanding of the circuit design. The CML-H+N18P-G62 GK5MP5X Schematic Diagram equips you with the technical insight needed to work efficiently and accurately.
Whether you’re diagnosing power issues or replacing a damaged IC, the schematic diagram acts as your roadmap, eliminating guesswork and ensuring that every repair is precise.
To assist you in repairing the Monster ABRA A5 like a pro, we’re offering a free download of the CML-H+N18P-G62 GK5MP5X Schematic Diagram. Click the link below to access the schematic and elevate your repair skills today!
Download “Monster ABRA A5 CML-H+N18P-G62 GK5MP5X Schematic Diagram” view – Downloaded 340 times – 92.99 KBRepairing the Monster ABRA A5 at a chip level can be daunting, but with the right tools and resources, you can approach it with confidence. The CML-H+N18P-G62 GK5MP5X Schematic Diagram is your ultimate guide to navigating the intricate circuits of this powerful laptop.
By combining this invaluable resource with your technical skills, you’ll not only save time but also enhance the quality of your repairs. So, download the schematic today and get started on tackling those motherboard issues like a skilled technician!

For tips on chip-level repair of laptop and desktop motherboards, visit our YouTube channel Repair Assistant and subscribe to our Facebook page repairassiastantbd for repair resource updates.
You also may be interested in
🌟Your Turn: Have you used schematic diagrams in your repair work? Share your experiences and tips in the comments below!