Download the Puma215i-TGL schematic diagram to simplify chip-level repairs of the Acer AIO AC22-1655 motherboard.
Chip-level motherboard repairs demand precision, patience, and accurate technical resources. When it comes to repairing the Acer AIO AC22-1655 motherboard, having access to the Puma215i-TGL schematic diagram can make all the difference. This invaluable resource simplifies complex repair processes, enabling technicians to troubleshoot and fix hardware issues effectively.
Why the Puma215i-TGL Schematic Diagram Matters
The Acer AIO AC22-1655 is a high-performance all-in-one (AIO) PC designed for productivity and reliability. However, like all electronics, its motherboard can encounter issues due to wear, power surges, or accidental damage. This is where the Puma215i-TGL schematic diagram comes into play.
Key Benefits of Using the Schematic Diagram
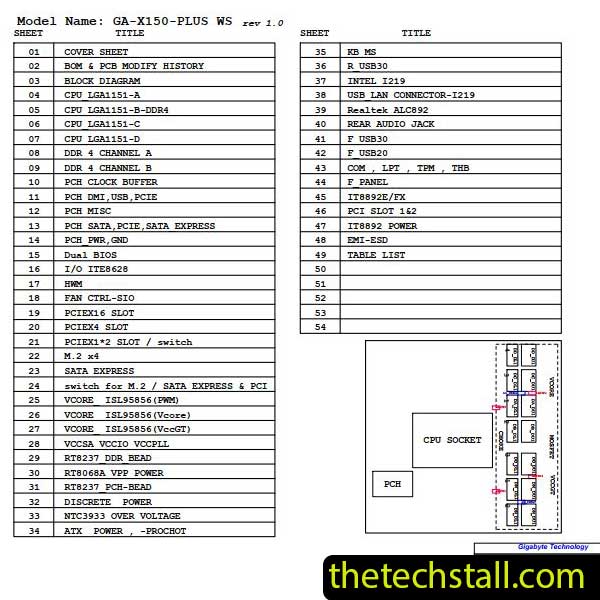
Clear Circuit Understanding: The diagram provides detailed insights into the motherboard’s circuits, enabling technicians to identify components, connections, and pathways.
Accurate Troubleshooting: With precise information about the motherboard’s design, identifying faulty components becomes straightforward, reducing the time spent on guesswork.
Component Replacement: The schematic highlights every component, from resistors to integrated circuits (ICs), making it easier to locate and replace damaged parts.
Efficiency in Repairs: Having a schematic diagram reduces repair time, improves accuracy, and increases the likelihood of a successful fix.
Features of the Puma215i-TGL Schematic Diagram
The Puma215i-TGL schematic diagram is a comprehensive guide tailored to meet the needs of professionals and DIY enthusiasts alike. Here are some standout features:
Detailed Component Layout: Every element of the motherboard is mapped, including capacitors, transistors, and ICs.
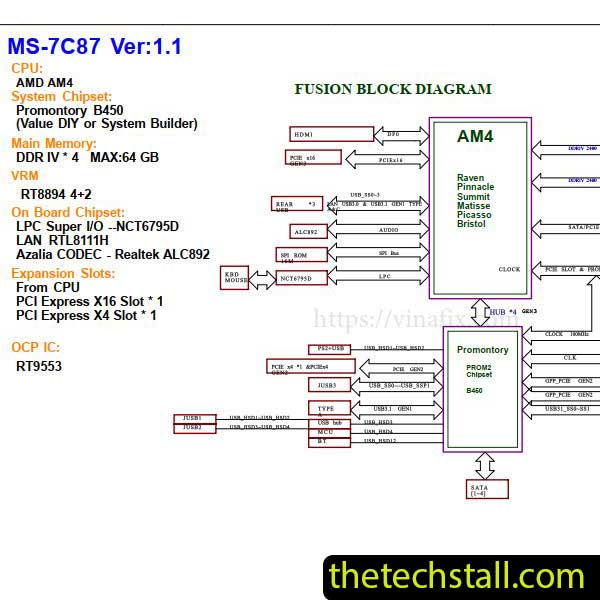
Power Supply Information: The diagram includes clear details about power delivery circuits, crucial for diagnosing power-related issues.
Signal Traces: Signal pathways are meticulously documented, helping to troubleshoot data and communication faults.
User-Friendly Format: The schematic is available in a clear, easy-to-read format, ensuring compatibility with various devices, including PCs and tablets.
High Resolution: Every line and label is crisp, reducing errors caused by misinterpretation.
How to Use the Puma215i-TGL Schematic Diagram
Once you download the schematic diagram, you can use it effectively by following these steps:
Study the Layout: Familiarize yourself with the motherboard’s sections and identify the area needing repair.
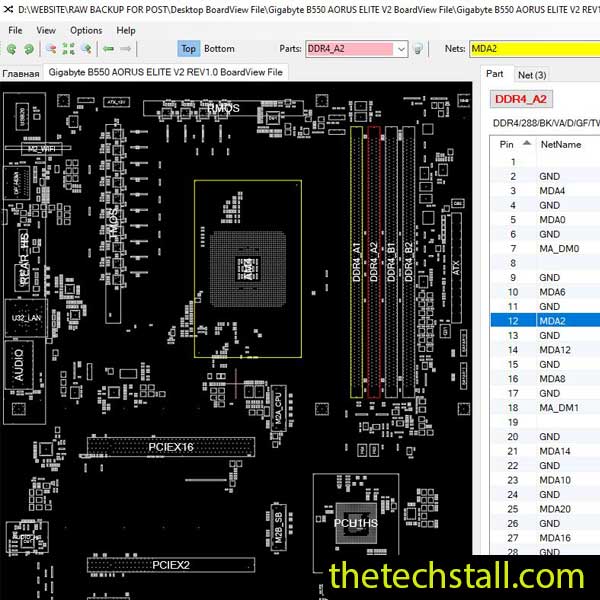
Trace the Fault: Use the diagram to trace signal paths, power supply lines, and data connections, pinpointing faults quickly.
Verify Component Functionality: Compare the schematic’s information with actual measurements using diagnostic tools like a multimeter or oscilloscope.
Perform Repairs: Replace damaged components or repair broken traces based on the diagram’s guidance.
Test the System: Reassemble the motherboard and test it thoroughly to confirm the repair.
How to Download the Puma215i-TGL Schematic Diagram
Ensure you’re downloading the correct file by checking the name and version. Once downloaded, save the file to your preferred location. Extract the contents if it’s in a compressed format like .zip or .rar. Open the file using a PDF reader or similar software, and you’re ready to start your repair journey.
Repairing the Acer AIO AC22-1655 motherboard doesn’t have to be a daunting task. By downloading the Puma215i-TGL schematic diagram, you equip yourself with the knowledge and tools needed to perform precise, effective chip-level repairs.
Don’t let a damaged motherboard slow you down. Access the schematic today and get your repairs on the right track.
For tips on chip-level repair of laptop, desktop motherboards check out our YouTube channel Repair Assistant and subscribe to our Facebook page repairassiastantbd for repair resource updates.