Fixing chip-level issues on a laptop motherboard isn’t guesswork—it’s a disciplined process built on the right documentation and analysis tools. For technicians working on the Acer Chromebook 13, the Z3ENN LA-B551P Schematic Diagram is one of the most valuable resources you can have on your bench. When used properly, it turns complex motherboard faults into traceable, solvable problems.
This guide walks through a professional, real-world approach to diagnosing and repairing chip-level faults using the Z3ENN LA-B551P Schematic Diagram, along with other essential repair resources.
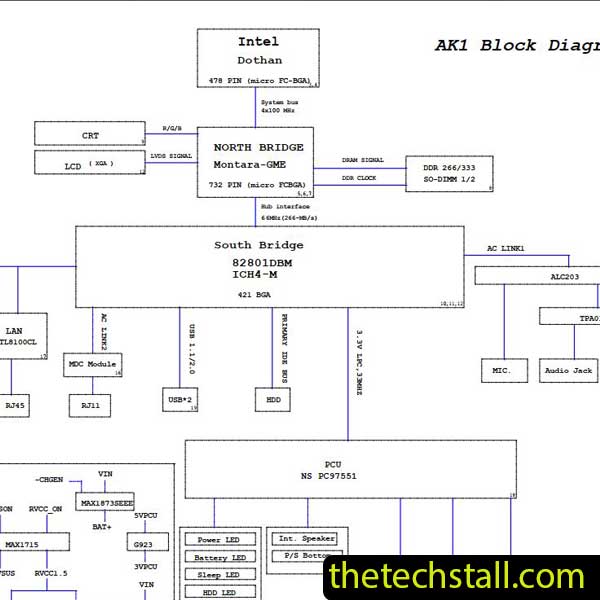
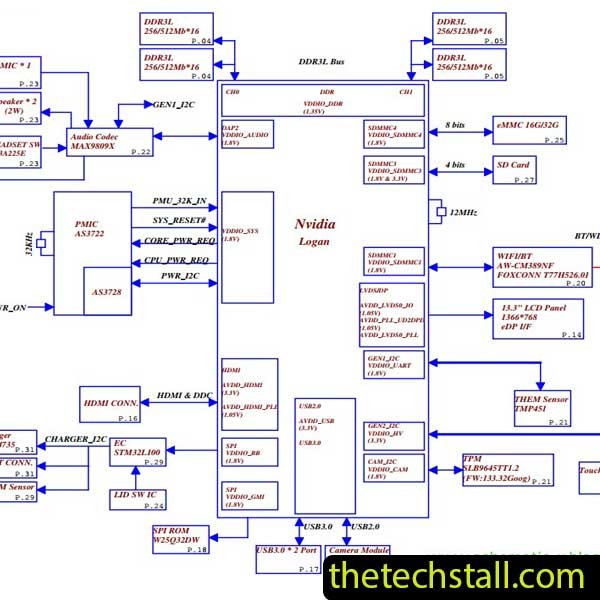
The Acer Chromebook 13 motherboard, identified as Z3ENN LA-B551P, is built with tightly integrated power rails, embedded controllers, and chipset-level dependencies. Unlike basic board repairs, chip-level troubleshooting requires understanding signal flow, voltage sequencing, and component interaction.
That’s where the Z3ENN LA-B551P Schematic Diagram becomes critical. It provides a complete electrical map of the board, including:
Without this schematic, you’re essentially repairing blind.
Start with a visual inspection. Look for burned components, corrosion, or physical damage. Common Acer Chromebook 13 issues include:
Once you identify symptoms, move to schematic-based diagnosis.
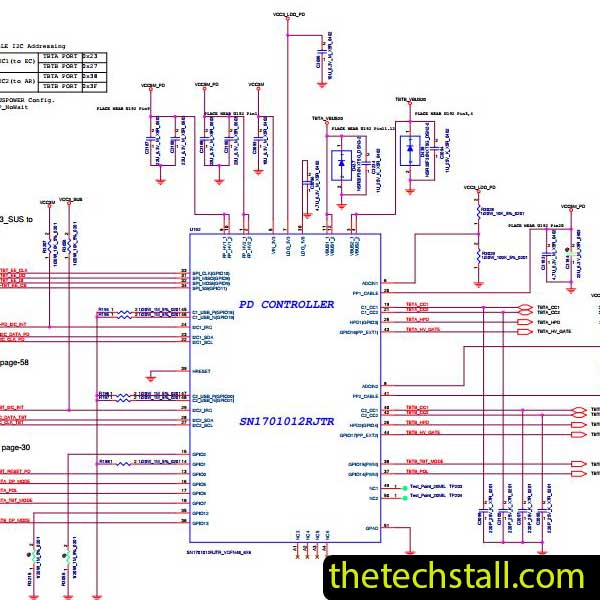
Open the Z3ENN LA-B551P Schematic Diagram and locate the main power sequence. Focus on:
Using a multimeter, check whether these rails are present. If a rail is missing, trace it backward in the schematic to find the controlling IC or MOSFET.
This step alone can narrow down faults significantly.
A schematic shows what is connected—but not where it is physically. That’s why pairing the Z3ENN LA-B551P Schematic Diagram with a Boardview file is essential.
Boardview tools help you:
Together, schematic + boardview creates a complete diagnostic environment.
Once power rails are verified, move to signal-level debugging. For example:
Using the schematic, follow signals between ICs. If a signal is missing, determine whether the issue lies in:
This is where chip-level expertise comes into play.
After isolating the faulty section:
The Z3ENN LA-B551P Schematic Diagram ensures you’re replacing the correct component—not guessing.
While the schematic is the backbone of motherboard repair, combining it with other tools improves accuracy and speed:
Using these resources alongside the Z3ENN LA-B551P Schematic Diagram creates a professional-grade repair workflow.
Technicians frequently encounter these issues on the Z3ENN LA-B551P board:
No Power Condition
Check DC input path and always-on rails. Use the schematic to trace missing voltage.
Short Circuit on Power Rail
Inject voltage and use thermal detection. The schematic helps identify all components tied to that rail.
No Display Issue
Trace LCD signals and backlight circuits through the schematic to isolate faults.
Charging Problem
Focus on charger IC and battery management section using schematic references.

For tips on chip-level repair of laptop and desktop motherboards, visit our YouTube channel Repair Assistant and subscribe to our Facebook page repairassiastantbd for repair resource updates.
You can access the Z3ENN LA-B551P Schematic Diagram here:
Make sure to keep this schematic in your repair library—it’s an essential resource for any technician working on this model.
If you’re serious about improving your chip-level repair skills, working alone will slow you down. That’s why joining a dedicated repair network makes a real difference.
Our community at:
👉 https://repaircommunity.thetechstall.com/
Gives you access to:
Instead of wasting hours searching for a single repair resource file in different places, join our repair community for free and request the file you want. Our tech support team will try to deliver it as quickly as possible. This is an effective way to improve quickly.
The difference between an average technician and a professional lies in process and tools. The Z3ENN LA-B551P Schematic Diagram is not just a document—it’s your roadmap to accurate, efficient motherboard repair.
When combined with boardview files, diagnostic tools, and a strong repair community, it allows you to confidently tackle even the most complex chip-level issues on the Acer Chromebook 13.